This is an old revision of the document!
Table of Contents
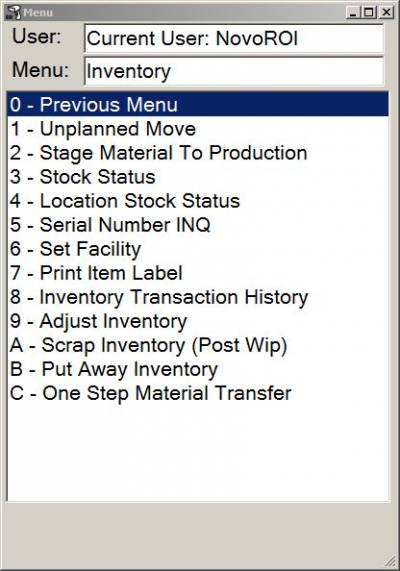
NovoNexus Inventory
Standard Inventory Constants
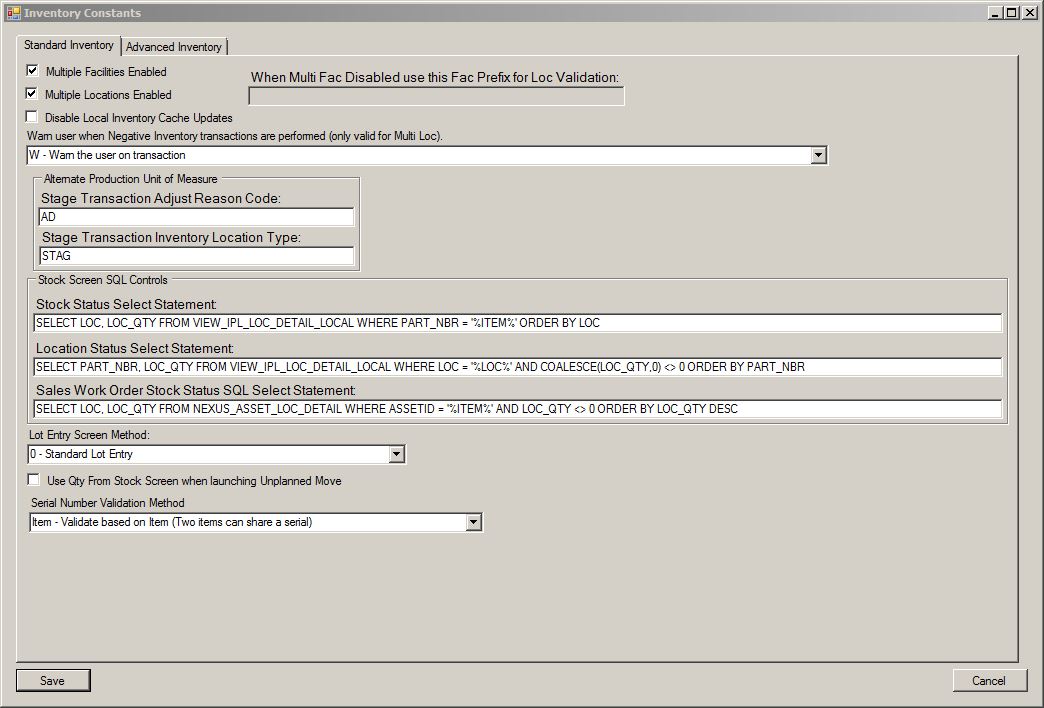
Set up Inventory Constants by going to the System Admin Menu → System Constants → Inventory Constants
The Standard Inventory Constants are found on the first tab of Inventory Constants.
Multiple Facilities Enabled
Toggle to disable/enable multiple facilites.
When Multi Fac Disabled use this Fac Prefix for Loc Validation
If Multiple Facilities is disabled, enter your home facility prefix here.
Multiple Locations Enabled
Toggle to disable/enable multiple locations.
Disable Local Inventory Cache Updates
Inventory caching keeps track of changes in inventory balances as they are processed on the scanners or desktop clients. These changes are then immediately reflected in the inventory position in NovoNexus transactions. The SQL table IPL_LOC_DETAIL_CACHE stores the temporary inventory information. Disabling Local Inventory Cache Updates by checking this box will stop the evaluation of IPL_LOC_DETAIL_CACHE. All inventory On-hand information will then come from IPL_LOC_DETAIL. This constant setting is most useful in an environment where NovoMotion is not rapidly updating the SQL database.
Warn user when Negative Inventory transactions are performed
This prompt is valid for multi-loc environments only. It has the following options:
- N - No warnings on error: This setting will allow the negative inventory transaction and will give no error/warning message.
- E - Error transaction: This setting will give the user an error message and block the negative inventory transition.
- W - Warn the user on transaction: This setting will give the user a warning message but allow the transaction if the user chooses to proceed.
Stage Transaction Adjust Reason Code
Enter the Adjust Reason Code for a Stage Transaction. Please Note:Setup for this functionality usually requires customization and consulting.
Stage Transaction Inventory Location Type
Enter the Stage Transaction Inventory Location Type for a Stage transaction. Please note:This function relies on a location with a custom location type of STAG. Setup for this functionality usually requires customization and consulting.
Stock Screen SQL Controls
The following Select Statements control how the data is sorted in the Stock Status and Location Stock Status functions, as well as a separate control for sorting Sales Work Orders in the Stock Status function.
- Stock Status Select Statment - The default is to order by location quantity.
- Location Status Select Statement - The default is to order by location quantity.
- Sales Work Order Stock Status SQL Select Statement - The default is to order by location quantity.
Lot Entry Screen Method
Set the lot entry screen option here.
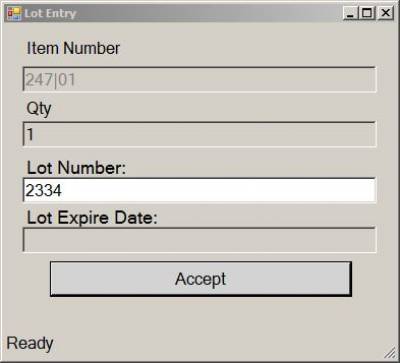
- 0 - Standard Lot Entry: This method requires the user to enter/scan the lot number only one time per transaction. For example, if there are 10 items being picked for shipping, the user will scan the lot number once for that transaction.
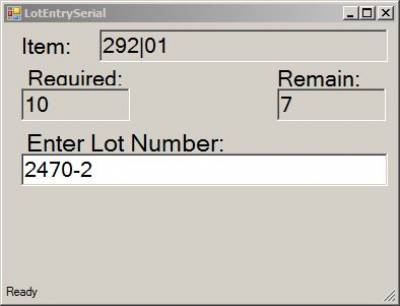
- 1 - Serial Lot Entry: This method requires the user to enter/scan the lot number once for each item quantity in the transaction. For example, if there are 10 items being picked for shipping, the user will enter/scan the lot number 10 times.
Use Qty from Stock Screen When Launching Unplanned Move
Toggle to enable the full quantity for a location to pre-fill into the Quantity to Move field in Unplanned Move when Unplanned Move is launched from within Stock Status.
Serial Number Validation Method
Serial numbers may be validated either by item number or by database. If validated by item number, more than one item can share a serial number, as long as the item number is different. If validated by database, a serial number may only be used once across the entire database. This constant setting will apply globally across all NovoNexus transactions with serial numbers. Select from the options below:
- Item - Validate based on item (Two items can share a serial)
- DB - Validate based on Database (No two items can share a serial)
Unplanned Move
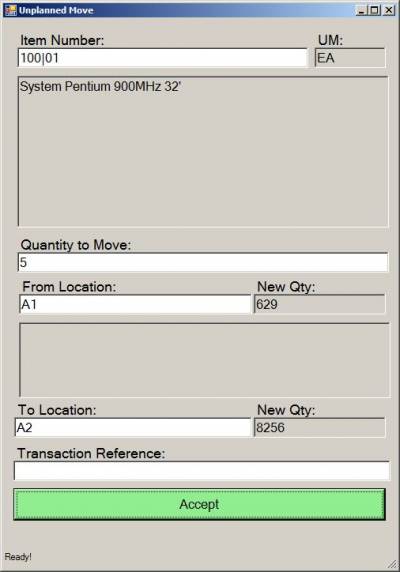
Item Number
Enter the item number of the Unplanned Move.
Please Note: The long part number or the superseded part number for an item may also be entered into the Item Number field to bring up the results for that item number. For example:
- If 110 is the superseded part number for 100, entering 110 into the Item Number field will bring up results for item 100.
- If 1234567 is the long part number for item 100, entering 1234567 into the Item Number field will bring up results for item 100.
Quantity to Move
Enter the quantity of the Unplanned Move.
From Location
Enter the current location of the item number.
If the item being moved is serial tracked or lot traced, entry of serial numbers or lot number will be required after the From Location is entered.
To Location
Enter the location to which the item number will be moved.
New Qty:
The new quantity that will be available in both the From Location and the To Location will display in these fields. This is the new quantity that will be available in each location once the transaction is complete.
Transaction Reference (not required)
Enter reference information to document the Unplanned Move.
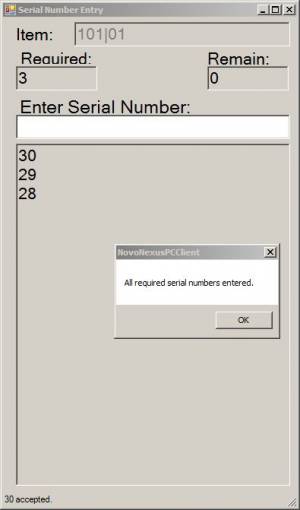
Serial Number Entry
If the item number being moved is serial tracked, the Serial Number Entry screen will open after the From Location is entered.
A valid serial number for an item with a status of On Hand must be entered for each item being moved. Once all serial numbers are entered, the user will be redirected back to the Unplanned Move screen to complete the transaction.
Lot Entry
If the item number being moved is lot traced, the Lot Entry screen will open after the From Location is entered.
Depending on the Lot Entry Screen Method set in Inventory Constants, one of the following Lot Entry screens will open.
Standard Lot Entry: Enter the lot number for the item being moved. The lot number is entered one time only.
Serial Lot Entry: Enter the lot number once for each quantity of the item being moved.
For example, if there are 10 items being moved, the lot number will need to be entered 10 times.
Once the lot number has been entered and accepted, the user will be redirected back to the Unplanned Move screen to complete the transaction.
Please Note: The Unplanned Move function can be launched directly from the Stock Status screen. Please see the Stock Status - Launch Other Actions section for details.
Stage Material to Production
This function relies on a location with a custom location type of STAG. Setup for this functionality usually requires customization and consulting.
Please Note: The Stage Material to Production function can be launched directly from the Stock Status screen. Please see the Stock Status - Launch Other Actions section for details.
Stock Status
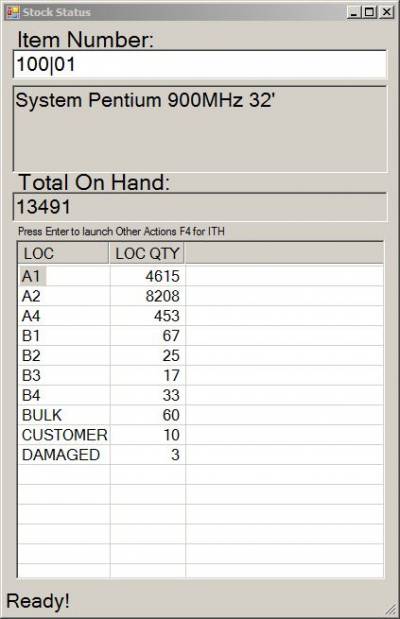
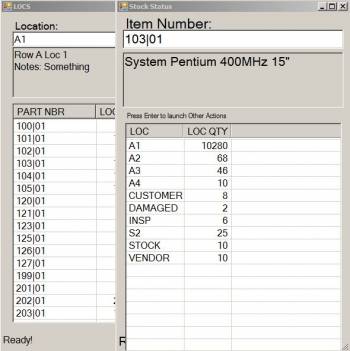
The Stock Status screen gives immediate, real-time information about part quantities in all locations.
Item Number
Enter the item number and hit <enter>.
- Total On Hand of this item for all locations will also display on this screen.
- Stock Status will display the locations and quantities for the home facility determined in Set Facility.
- If you would like to look up the stock status for an item number in a different facility, enter the item number and facility code separated by the vertical bar character: |
- For example, 102|02 will show stock status for Facility 02.
Please Note: The long part number or the superseded part number for an item may also be entered into the Item Number field to bring up the results for that item number. For example:
- If 110 is the superseded part number for 100, entering 110 into the Item Number field will bring up results for item 100.
- If 1234567 is the long part number for item 100, entering 1234567 into the Item Number field will bring up results for item 100.
Stock Status - Launch Other Actions
The Unplanned Move, Stage Material to Production, and Put Away Inventory functions can be launched directly from the Stock Status screen (*see note below on security).
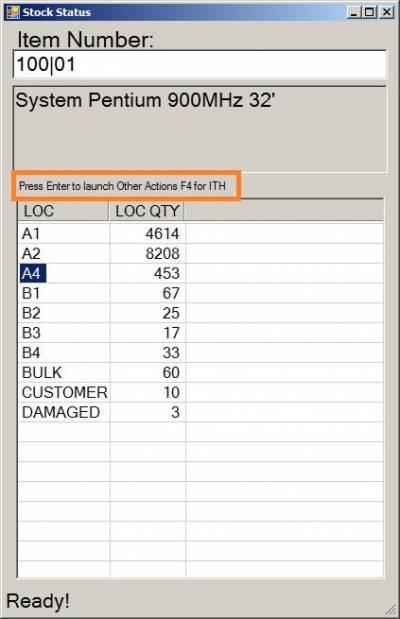
- Use the arrow keys to move to the desired FROM location for the Unplannned Move, Stage Material transaction, or Put Away Inventory transaction. Launching with a specific location highlighted will default that location as the FROM location in the selected transaction.
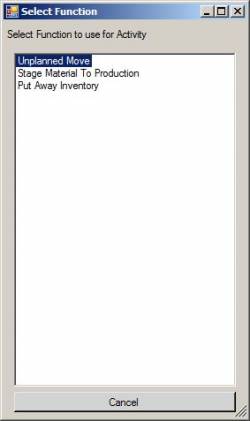
- Hit <enter> to open the Select Function Screen.
- Chose the desired function and hit <enter> to open it in another window.
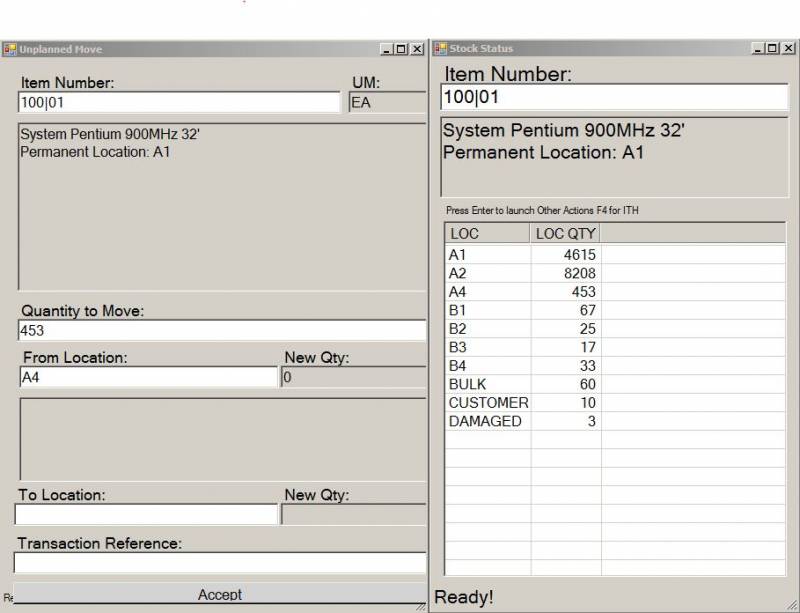
If the Use QTY from Stock Status when launching Unplanned Move constant is enabled, the entire quantity for the location selected will pre-fill into the Quantity to Move field when Unplanned Move is launched form Stock Status. For example, as seen in the screenshot below, location A4 was selected when launching Unplanned Move from the Stock Status screen, so the entire quantity of 453 items from A4 is pre-filled into the Quantity to Move field in the newly launched Unplanned Move screen:
*PLEASE NOTE: Use the NovoNexus Security Build to block a user's ability to access any or all of these functions directly from the Stock Status screen. If you block any of these functions for the user, only the allowed function(s) will display in the Select Function window.
Press F4 for ITH
Press F4 to to launch the Inventory Transaction History screen for the item number displayed.
Location Stock Status
Location
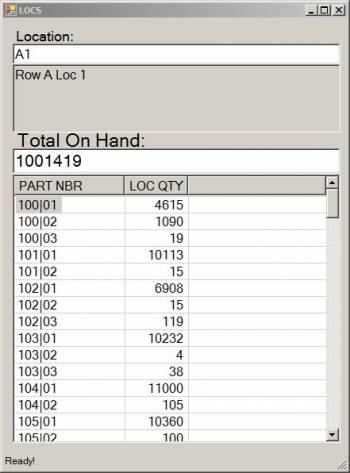
Enter the location and hit <enter>.
The Total On Hand for all items in the location will also display on this screen.
Launch Stock Status from Location Stock Status
The Stock Status function can be launched for a specific item from within the Location Stock Status screen.
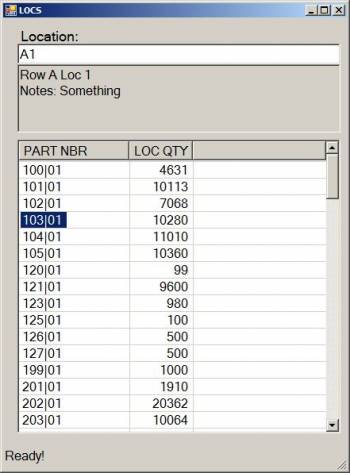
Highlight the desired item number as in the example below:
Hit <enter> with the item number highlighted and the Stock Status screen for that item will open in a new window.
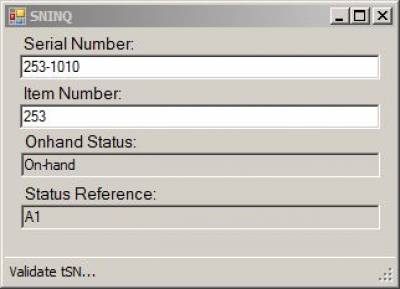
Serial Number Inquiry
Serial Number
Enter the serial number and hit <enter>.
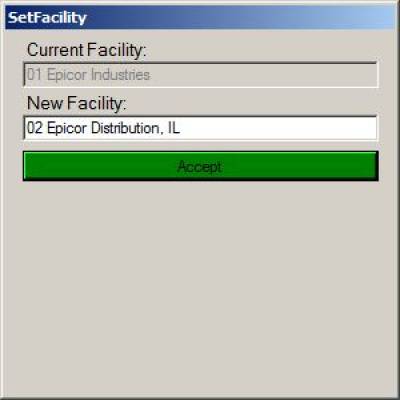
Set Facility
New Facility
Enter the facility code in the New Facility field to change the Current Facility.
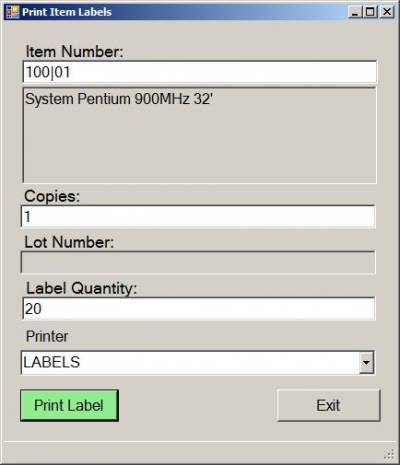
Print Item Labels
Item Number
Enter the Item number.
Please Note: The long part number or the superseded part number for an item may also be entered into the Item Number field to bring up the results for that item number. For example:
- If 110 is the superseded part number for 100, entering 110 into the Item Number field will bring up results for item 100.
- If 1234567 is the long part number for item 100, entering 1234567 into the Item Number field will bring up results for item 100.
Copies
The number entered here controls how many labels will print.
Lot Number
If the item number is lot traced, enter the lot number.
Label Quantity
The number entered here will print on the label.
Printer
Enter the printer or select from the dropdown list.
Print Label Button
Hit the Print Label button to print the labels.
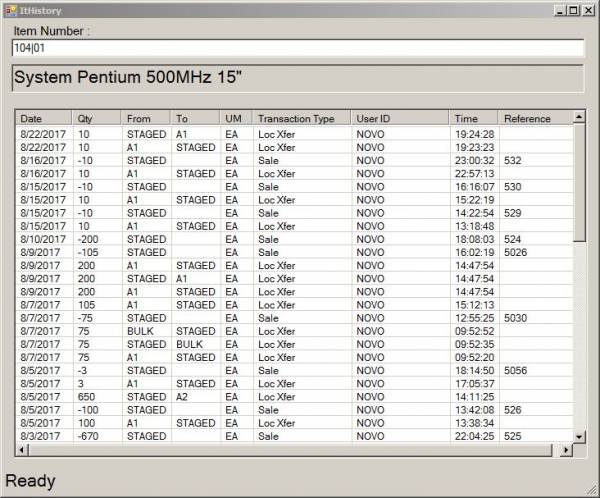
Inventory Transaction History
Item Number
Enter the item number and hit <enter>.
Please Note: The long part number or the superseded part number for an item may also be entered into the Item Number field to bring up the results for that item number. For example:
- If 110 is the superseded part number for 100, entering 110 into the Item Number field will bring up results for item 100.
- If 1234567 is the long part number for item 100, entering 1234567 into the Item Number field will bring up results for item 100.
Adjust Inventory
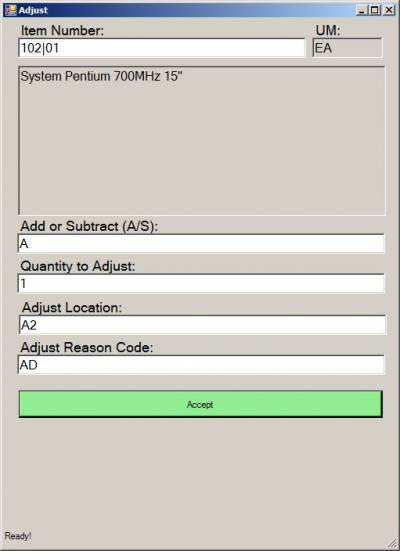
The Adjust transaction processes on-hand inventory adjustments and creates an Inventory Transaction (IT) record.
Item Number
Enter the Item Number.
Please Note: The long part number or the superseded part number for an item may also be entered into the Item Number field to bring up the results for that item number. For example:
- If 110 is the superseded part number for 100, entering 110 into the Item Number field will bring up results for item 100.
- If 1234567 is the long part number for item 100, entering 1234567 into the Item Number field will bring up results for item 100.
Add or Subtract (A/S)
Enter A to add inventory to a location.
Enter S to subtract inventory from a location.
Quantity to Adjust
Enter the quantity to be adjusted.
Adjust Location
Enter the location for the adjustment.
If the item being adjusted is serial tracked or lot traced, entry of serial numbers or lot number will be required after the Adjust Location is entered.
Adjust Reason Code
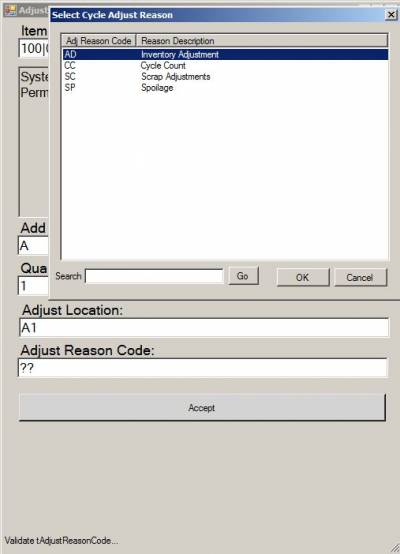
Enter the adjust reason code. The adjust reason code options are loaded via the schema NEXUS.ADJUST.REASONS.
Entering two periods (..) or two question marks (??) into this field will pop up a list of adjust reason code options.
Serial Number Entry
If the item number being adjusted is serial tracked, the Serial Number Entry screen will open after the Adjust Location is entered.
A valid serial number for an item with a status of On Hand must be entered for each item being adjusted.
Once all serial numbers are entered, the user will be redirected back to the Adjust screen to complete the transaction.
Lot Entry
If the item number being adjusted is lot traced, the Lot Entry screen will open after the Adjust Location is entered.
Depending on the Lot Entry Screen Method set in Inventory Constants, one of the following Lot Entry screens will open.
Standard Lot Entry: Enter the lot number for the item being adjusted. The lot number is entered one time only.
Serial Lot Entry: Enter the lot number once for each quantity of the item being adjusted.
For example, if there are 10 items being adjusted, the lot number will need to be entered 10 times.
Once the lot number has been entered and accepted, the user will be redirected back to the Adjust screen to complete the transaction.
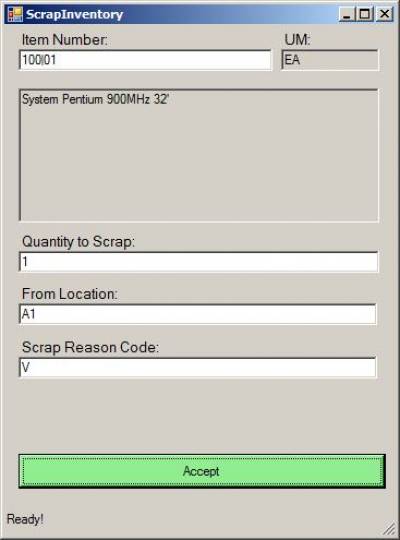
Scrap Inventory (Post Wip)
This is a function for scrapping inventory post WIP. This function requires additional set up and training beyond standard Adjust functioning.
Clients interested in using this function should contact NovoRoi Systems for training and set up assistance.
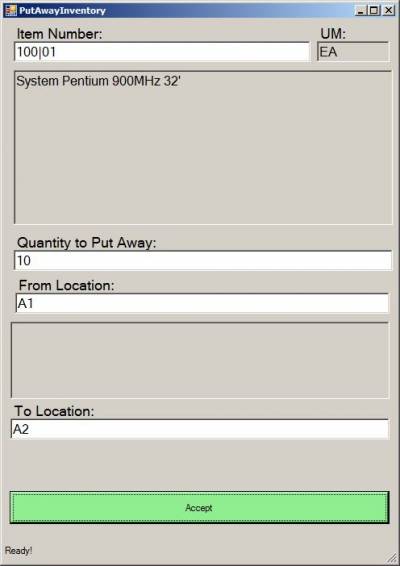
Put Away Inventory
This is a function to put away inventory that will default a To Location to the Client, based on user settings. This function requires additional set up and training beyond standard UNPLANNED MOVE functioning. Please contact NovoRoi Systems for training and set up assistance.
Please Note: The Put Away Inventory function can be launched directly from the Stock Status screen. Please see the Stock Status - Launch Other Actions section for details.
One Step Material Transfer
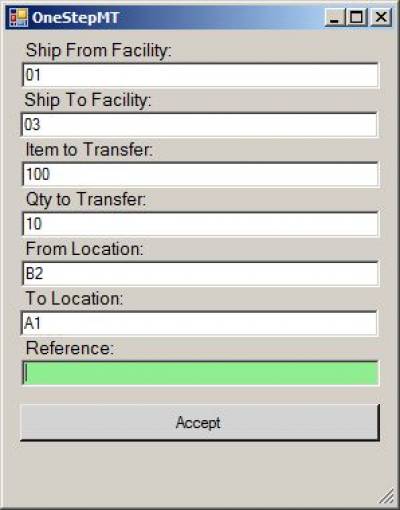
The One Step Material Transfer function moves items from one facility to another in one step.
Please Note: The One Step Material Transfer function does not require the user to change/set facility unless the item number being transferred is serial tracked or lot traced. The validation required for transferring items that are serial tracked or lot traced requires the user to set their current facility in NovoNexus to the Ship From Facility being entered in the One Step MT transaction in order to complete the transaction. Please see Set Facility for how to change/set facility.
Ship From Facility
Enter the current facility of the item number.
Ship To Facility
Enter the facility to which the item number will be moved.
Item to Transfer
Enter the item number to be moved.
Please Note: The long part number or the superseded part number for an item may also be entered into the Item Number field to bring up the results for that item number. For example:
- If 110 is the superseded part number for 100, entering 110 into the Item Number field will bring up results for item 100.
- If 1234567 is the long part number for item 100, entering 1234567 into the Item Number field will bring up results for item 100.
Qty to Transfer
Enter the quantity to move.
From Location
Enter to location of the item in the Ship From Facility.
To Location
Enter the location to which the item will be moved in the Ship To Facility.
Reference (not required)
Enter reference information to document the One Step Material Transfer.
Serial Number Entry
If the item number being transferred is serial tracked, the Serial Number Entry screen will open after the From Location is entered.
A valid serial number for an item with a status of On Hand must be entered for each item being transferred.
Once all serial numbers are entered, the user will be redirected back to the One Step MT screen to complete the transaction.
Please Note: The One Step Material Transfer function does not require the user to change/set facility unless the item number being transferred is serial tracked or lot traced. The validation required for transferring items that are serial tracked or lot traced requires the user to set their current facility in NovoNexus to the Ship From Facility being entered in the One Step MT transaction in order to complete the transaction. Please see Set Facility for how to change/set facility.
Lot Entry
If the item number being transferred is lot traced, the Lot Entry screen will open after the From Location is entered.
Depending on the Lot Entry Screen Method set in Inventory Constants, one of the following Lot Entry screens will open.
Please Note: The One Step Material Transfer function does not require the user to change/set facility unless the item number being transferred is serial tracked or lot traced. The validation required for transferring items that are serial tracked or lot traced requires the user to set their current facility in NovoNexus to the Ship From Facility being entered in the One Step MT transaction in order to complete the transaction. Please see Set Facility for how to change/set facility.
Standard Lot Entry: Enter the lot number for the item being transferred. The lot number is entered one time only.
Serial Lot Entry: Enter the lot number once for each quantity of the item being transferred.
For example, if there are 10 items being transferred, the lot number will need to be entered 10 times.
Once the lot number has been entered and accepted, the user will be redirected back to the One Step MTt screen to complete the transaction.

