Table of Contents
Advanced Inventory
Advanced Inventory Constants
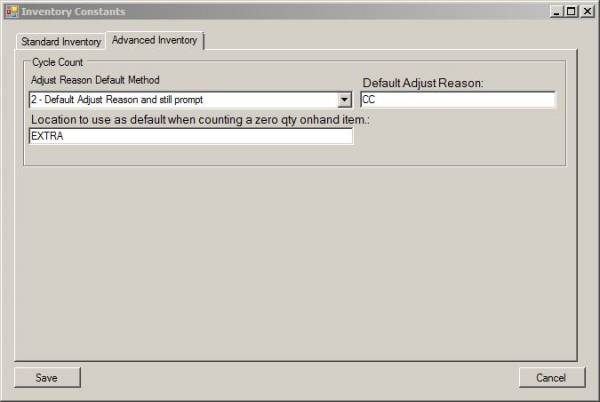
Set up Advanced Inventory Constants by going to the System Admin Menu → System Constants → Inventory Constants
The Advanced Inventory Constants are found on the second tab of Inventory Constants.
Cycle Count Adjust Reason Default Method
An Adjust Reason is required for ADI Cycle Count transactions. This prompt controls how the Adjust Reason is entered. It has the following options:
- 1 - No Default Adjust Reason: This setting does not pre-fill the Adjust Reason Code field in the Cycle Count screen blank with a predetermined Adjust Reason. The user will be required to enter an Adjust Reason code with each location counted.
- 2 - Default Adjust Reason and still prompt: This setting allows for a default Adjust Reason Code to pre-fill into the Adjust Reason Code field on the Cycle Count screen. The user is able to change the Adjust Reason Code to another one as needed.
- 3 - Default Adjust Reason no prompting: This setting automatically assigns the Default Reason Code to each location counted. If this setting is chose, the Adjust Reason Code field will be greyed out and the user is not required to enter anything into this field.
Cycle Count Default Adjust Reason
Enter the Adjust Reason Code to use with the Cycle Count Adjust Reason Default Method options 2 & 3. If using option 1, leave this field blank.
Please Note: Please log off and log back in to NovoNexus after changing the Cycle Count Adjust Reason Code Default Method or Default Adjust Reason to enable the change to take effect.
Location to use as default when counting a zero quantity onhand item
This constant sets a default location for use when a zero quantity on-hand item is being counted in the Cycle Count function. The location entered here needs to be a WHSE location type and needs to be set up in the ERP system. Please follow the guidelines and constants settings in the ERP system to allow for the generation and counting of cycle count tags for zero quantity on-hand items.
PI Tag Entry
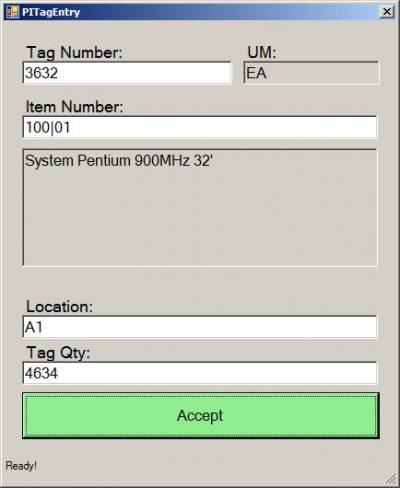
The PI Tag Entry function allows for the entry of Physical Inventory Tags. The Physical Inventory count details entered in the NovoNexus PI Tag Entry functions are delivered to your ERP system via ADI processes. Please refer to your ERP system documentation for Physical Inventory set up and processing information.
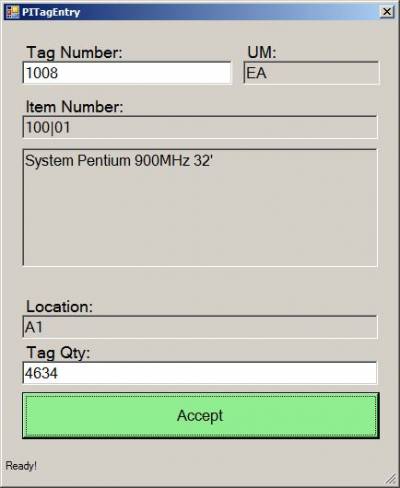
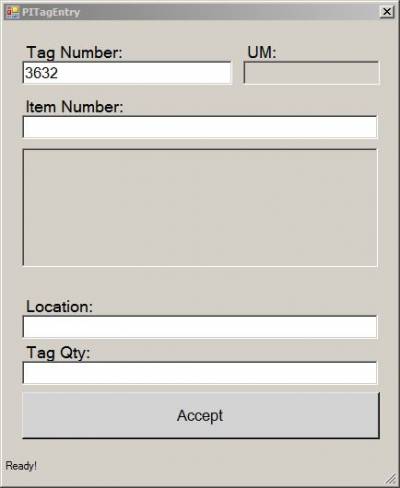
PI Tag Entry Screen
Tag Number
Enter the physical inventory tag number by scanning the tag number from a barcode or typing it into the Tag Number Field.
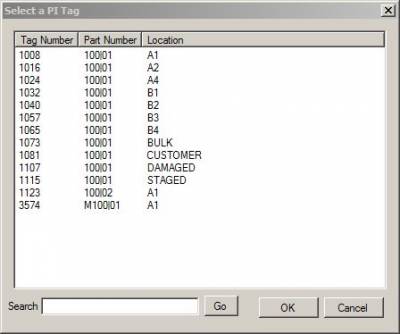
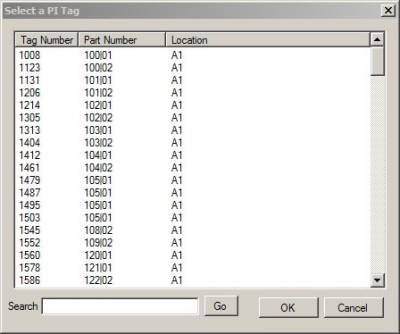
Alternate Tag Number Entry Method: Search for the tag number by entering either the item number or the location into the Tag Number field. A new screen will open with a list of all the relevant tag numbers for the item number or location entered:
Navigate to the desired tag number on the Select a PI Tag screen:
- Scan the tag number from a barcode. (PC Client with USB connected scanner or handheld device)
- Use the the arrow keys to maneuver to the correct tag number. Once the correct tag number line is highlighted, press the OK button or hit <enter> to open the PI Tag Entry screen. (PC Client or handheld device)
- Use the keyboard to type in the tag number. The correct line for that tag will be highlighted. Press the OK button or hit <enter> to open the PI Tag Entry screen.(PC Client or handheld device)
- To further refine your search, type the tag number, part or location into the Search field and press the Go button or hit <enter>. If there is still more than one result displayed, maneuver to the correct tag number line. Press the OK button or hit <enter> to open the PI Tag Entry screen. (PC Client or handheld device)
UM
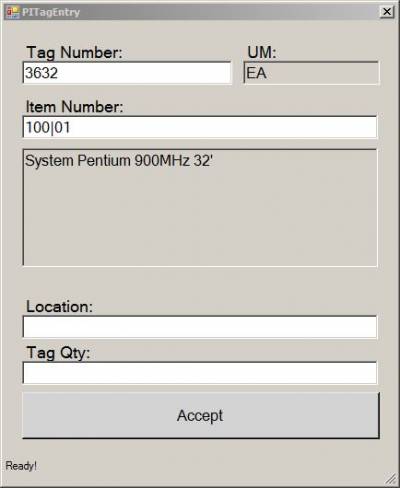
The unit of measure for the item number will fill in automatically.
Item Number
The item number for the tag number will fill in automatically, along with the description of the item number.
Location
The location being counted for this tag number will fill in automatically.
Tag Qty
Enter the quantity counted for tag (for the displayed item and location).
Accept
Hit <enter> to accept the count details for this tag.
Rekey a Count
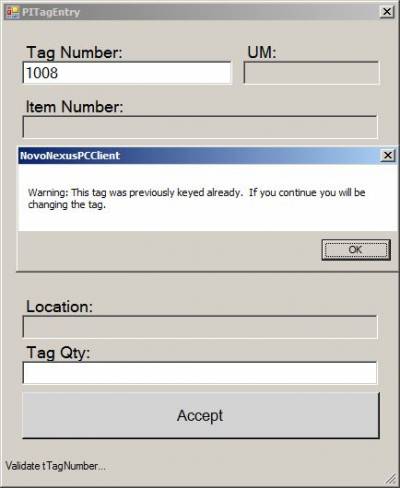
Open the PI Tag Entry screen and enter the tag number for the count being rekeyed. A pop-up message will display to warn the user that entering a new count will change the record:
Enter the new count and hit <enter> to accept the rekeyed amount.
Blank Tags
If the user is entering a blank tag (a tag not associated with a particular item and location), the UM, Item Number and location will be blank.
Item Number
Enter the item number being counted. Once the item number is entered, the UM and item description will fill in appropriately.
Please Note: The long part number or the superseded part number for an item may also be entered into the Item Number field to bring up the results for that item number. For example:
- If 110 is the superseded part number for 100, entering 110 into the Item Number field will bring up results for item 100.
- If 1234567 is the long part number for item 100, entering 1234567 into the Item Number field will bring up results for item 100.
Location
Enter the location for the item being counted.
Tag Qty
Accept
Hit <enter> to accept the count details for this tag.
Cycle Count Entry
The Cycle Count Entry function allows for the entry of inventory cycle counts by part. The Cycle Count Entry details entered in the NovoNexus Cycle Count Entry functions are delivered to your ERP system via ADI processes. Please refer to your ERP system documentation for Cycle Count set up and processing information.
Cycle Count Screen
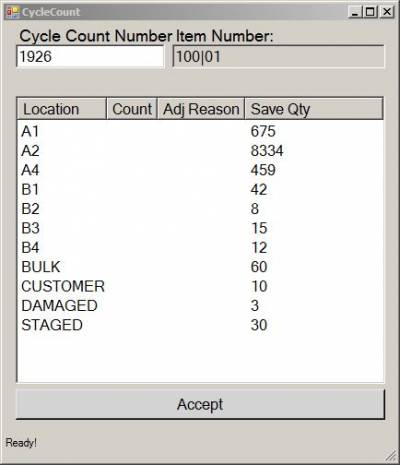
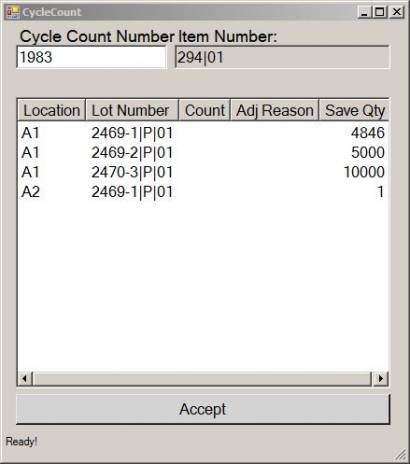
The Cycle Count Entry screen is used for first counts only. If an item being counted is lot traced, the locations displayed for counting will be broken down by location and lot number combinations.
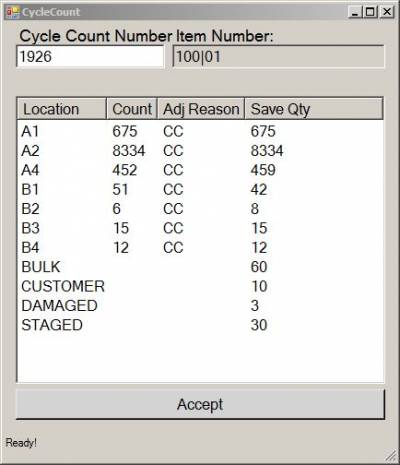
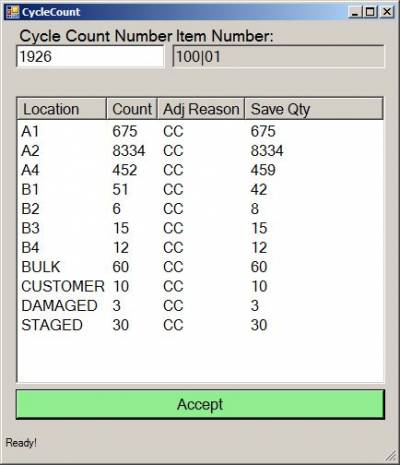
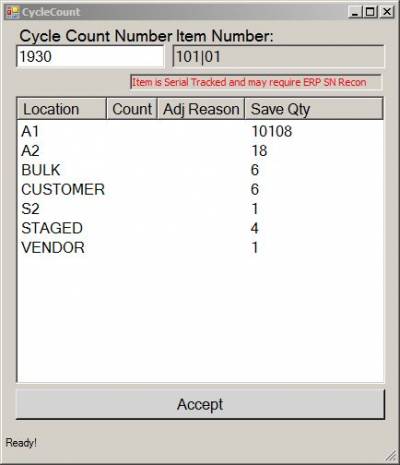
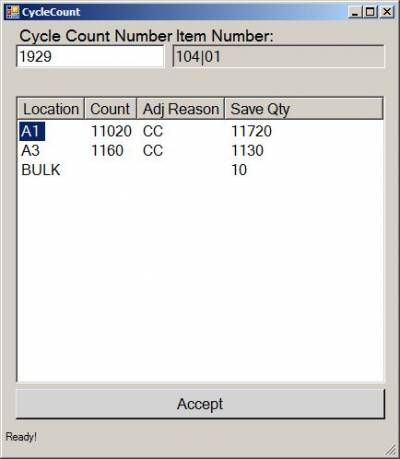
The following screenshots show the Cycle Count screen without a lot traced item and with a lot traced item, respectively:
Cycle Count Number
Enter the cycle count number
Item Number
The item number for the cycle count number will fill in automatically.
Cycle Count Location/Lot Number/Count/Adj Reason/Save Qty Window
This window displays the locations to be counted, lot numbers per location (if applicable), any first counts that have been entered for that location, the adjust reason given, and the Saved Qty (current quantity for the location before the count) of the item in the location.
Navigation in the Cycle Count Location/Adj Reason/Save Qty Window
After the cycle count number is entered, the first location on the list will be highlighted. Press <enter> to open the Cycle Count Detail screen for the first highlighted location.
Navigate to different locations on the list using the keyboard or a handheld device:
- Use the the arrow keys to maneuver to a different location and then press <enter> to open the Cycle Count Detail screen. (PC Client or handheld device)
- Use the keyboard to type in the location. (PC Client or handheld device)
- Scan the location from a barcode. (PC Client with USB connected scanner or handheld device)
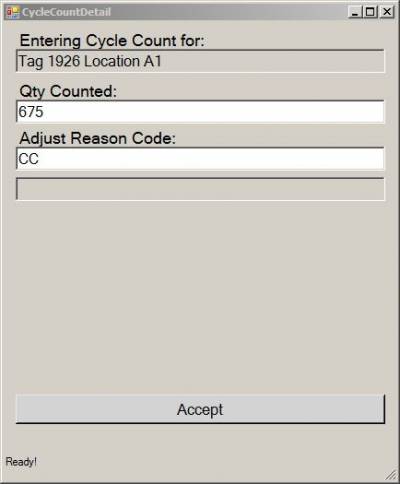
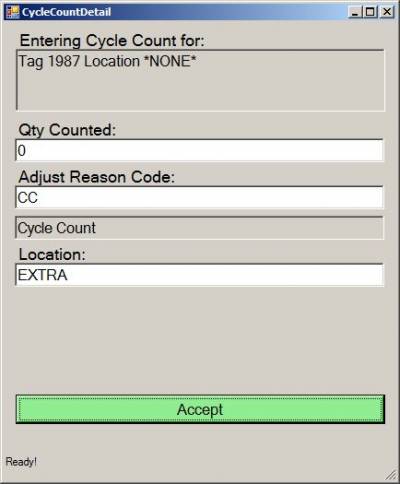
Cycle Count Detail Screen
Entering Cycle Count for:
This field displays the Cycle Count tag number and location for the count being entered.
Qty Counted:
Enter the quantity of the count for this item and location.
Adjust Reason Code
Depending on how Inventory Constants for Cycle Count are set, enter the Adjust Reason code or accept/change the default adjust reason code. If the Cycle Count Adjust Reason Default Method is set to option 3, this field will not be displayed.
Please Note: For further information on setting the Cycle Count Adjust Reason Count Default Method and Cycle Count Default Adjust Reason Code, please see Inventory Constants
Accept
Hit <enter> to accept the count details for this location.
Continue to Enter Counts for Each Location
After accepting a count for a location, the Cycle Count Detail screen will close and the application will return to the Cycle Count Entry screen. Hit <enter> to open the Cycle Count Detail screen for the next location. As you continue to enter and accept the accounts for each location, the Cycle Count Entry window will fill with the enter counts and adjust reasons.
Please Note: If you exit the Cycle Count Entry screen before accepting the transaction, your entered counts will be saved but not committed to the ERP database.
Accept the Cycle Count Entry Transaction
Once all locations for a tag have been counted and entered into the appropriate Cycle Count Detail screen, review the Cycle Count Entry window. If you have entered all of the locations in order, the Accept button will be highlighted. If you need to navigate to the Accept button, hit <tab> or use the arrow keys to get to the Accept button.
If changes need to be made to the count for a location before the transaction is accepted, use the navigation methods (detailed in the Navigation section above) to maneuver to the desired location. Press <enter> to re-open the Cycle Count Detail screen for that location. Make any needed changes and press Accept to save the changes.
Once all locations have been reviewed, submit the transaction by hitting Accept.
PLEASE NOTE:
- Accepting the transaction will cause the appropriate inventory adjustments to be made. How inventory adjustments are made is determined by your ERP system setup and count tolerance constants and settings. Refer to your ERP system documentation for specifics.
- If an item counted has a Count Tolerance associated with it AND the item has a count discrepancy that exceeds the Count Tolerance allowable amount, a recount on the item will be triggered. Inventory adjustments for the entire tag number will be held until the recount for the location is completed.
- If a location in the Cycle Count Entry window is not counted and left blank at the time the transaction is accepted, it will be treated as a missing count. A recount will be triggered for that location.
- Cycle Count records (aka tags, numbers) with required recounts will be handled in the Cycle Count Recount Workbench.
- Serial Number tracked items may require additional processing and may require a recount outside of the NovoNexus Cycle Count Entry process. Please see the section below on Serial Number Tracked items.
Cycle Count Entry for a Zero Quantity On-hand Item
If your ERP system is set up to include Zero On-hands when generating Cycle Count tags, the NovoNexus system will allow for Cycle Count entry on zero quantity on-hand items.
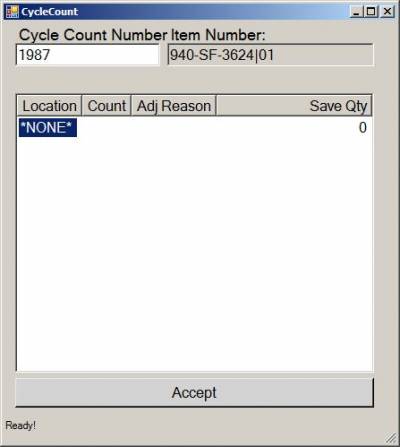
The Cycle Count Entry screen for a zero on-hand item will have *NONE* entered for the location:
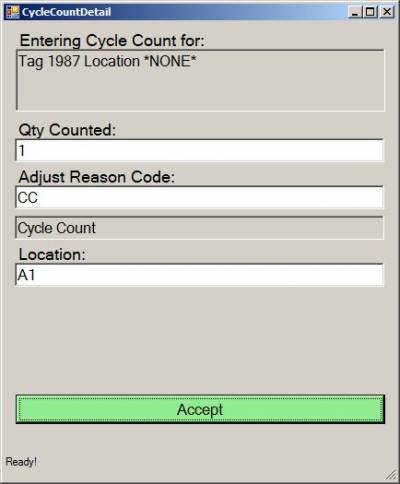
To enter a new count that is not zero for this item, with *NONE* highlighted press <enter> to open the Cycle Count Detail screen:
Qty Counted:
Enter the quantity for the new count for this item.
Adjust Reason Code
Depending on how Inventory Constants for Cycle Count are set, enter the Adjust Reason code or accept/change the default adjust reason code. If the Cycle Count Adjust Reason Default Method is set to option 3, this field will not be displayed.
Please Note: For further information on setting the Cycle Count Adjust Reason Count Default Method and Cycle Count Default Adjust Reason Code, please see Advanced Inventory Constants
Location
Enter the location for the new count on the item.
Accept
Hit <enter> to accept the count details.
Please Note: If a zero on-hand item has a Count Tolerance associated with it and you enter a value above zero when counting, a recount on the item will be triggered. Inventory adjustments for the tag number will be held until the recount is completed.
To enter a count of zero for this item and maintain the zero on-hand status on the item, with *NONE* highlighted press <enter> to open the Cycle Count Detail screen:
Qty Counted:
Enter a count of “0” for this item.
Adjust Reason Code
Depending on how Inventory Constants for Cycle Count are set, enter the Adjust Reason code or accept/change the default adjust reason code. If the Cycle Count Adjust Reason Default Method is set to option 3, this field will not be displayed.
Please Note: For further information on setting the Cycle Count Adjust Reason Count Default Method and Cycle Count Default Adjust Reason Code, please see Advanced Inventory Constants
Location
Any location can be entered here, as no inventory will be recorded in this location when a zero count is entered. The default location set for zero quantity counts can be used here. (Please see Advanced Inventory Constants.)
Accept
Hit <enter> to accept the count details.
Cycle Count Entry and Serial Numbers
Additional serial number reconciliation processing is necessary if items counted are serial tracked and a count discrepancy is encountered while cycle counting. The NovoNexus Cycle Count Entry screen will warn you when your item is serial tracked.
PLEASE NOTE:
- ERP SN Reconciliation must be completed outside of the NovoNexus Cycle Count Entry process.
- If a recount is triggered on a serial tracked item, the recount must be completed outside of the NovoNexus Cycle Count Recount Workbench process.
When you encounter this serial number warning in the NovoNexus Count Entry screen, the following steps need to be followed:
- Enter the first count of the serial number tracked item into the NovoNexus Cycle Count Entry window.
- If there are no count discrepancies, your cycle count record will be reconciled and the count entry process will be complete.
- If there are count discrepancies, the cycle count record will be held up until the ERP SN Reconciliation process is completed.
- Complete the ERP SN Reconciliation process in your ERP system. (Refer to your ERP system Cycle Count documentation.)
- If the serial tracked item has no Count Tolerance associated with it OR the discrepancy does not exceed the Count Tolerance allowable amount, the record will be reconciled and the count entry process completed AFTER the ERP SN Reconciliation takes place.
- If the serial tracked item has a Count Tolerance associated with it AND the discrepancy exceeds the Count Tolerance allowable amount, a recount on the item will be triggered.
- Complete any required Cycle Count Recounts in your ERP system per the standard procedures.
Cycle Count Recount Workbench
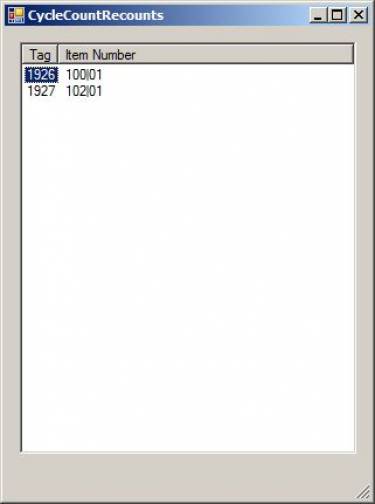
In the event a recount on a Cycle Count Record is triggered, either due to a missing count or an out-of-tolerance count, the Cycle Count Number will be listed in the Cycle Count Recount Workbench. Complete all recounts using this function.
Please Note: It may be necessary to wait a few minutes after the last Cycle Count entry is completed for the transactions to be processed in your ERP system. Once the transactions have processed, the correct tags needing a recount will appear in the Cycle Count Recount Workbench.
Tag
The Cycle Count Number (or tag) that needs to be recounted.
Item Number
The Item Number associated wiih the tag.
Recount Process
The first tag needing a recount will be highlighted. Press <enter> to open the first highlighted tag, or use the arrow keys to maneuver to another tag and press <enter> to open it.
When the Cycle Count Recount screen opens for the selected tag, only the locations that require a recount will be listed. The Count, Adjust Reason, and the Saved Qty (current quantity for the location before the count) for the item in that location will be listed. Any locations with missing counts will have no entry for the Count or the Adjust Reason.
To accept the counts as entered for all the locations, use the arrow keys to maneuver to the Accept button and accept the count.
If any adjustments need to be made, use the arrow keys to maneuver to a location and then press <enter> to open the Cycle Count Detail screen for that location. Make any needed changes and hit Accept to save the changes.
PLEASE NOTE:
- ALL changes will be automatically accepted. There is no tolerance percentage check on recounts.
- Accepting the recount will cause the appropriate inventory adjustments to be made.
- If an uncounted location remains uncounted, the Save Qty will be treated as correct and recorded as being counted for history records. No inventory adjustment will take place for uncounted locations.
To return to the Cycle Count Recount Workbench to open another tag for recount, hit <esc> to exit the Cycle Count Entry screen. Open the next tag for recount.
To refresh the Cycle Count Recount Workbench, hit <esc> to exit the workbench and then reopen the Cycle Count Recount Workbench. If no recounts are needed a message will display indicating that no more recounts are needed.
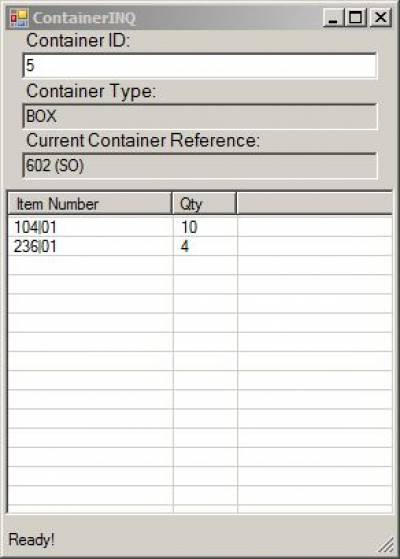
Container INQ
This function displays the item numbers, quantities and reference details for the current contents of a container.
Container ID
Enter the Container ID.
Container Type
The type of container will display here: box, pallet, etc.
Current Container Reference
The current container reference for the container will display here along with the reference type in parenthesis: Sales Order number (SO) , Load number (LOAD), Inventory location (INT), etc.

