Table of Contents
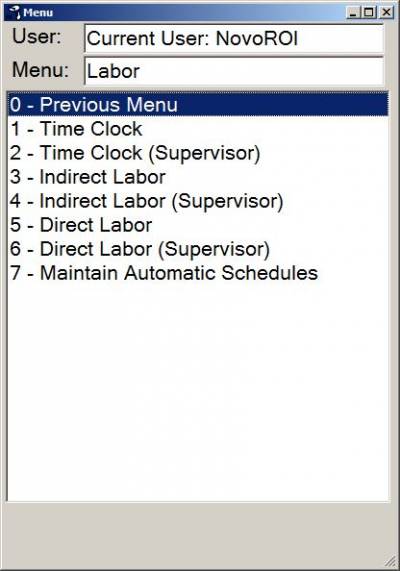
Labor
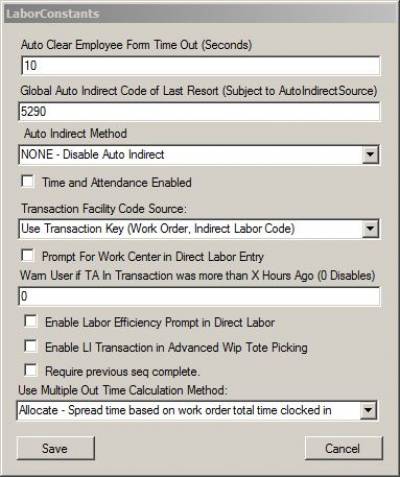
Labor Constants
Auto Clear Employee Form Time Out (Seconds)
This constant sets the amount of time in seconds until the Labor entry screens timeout and clear when data is entered in a screen but the transaction is not completed.
Entering a 0 (zero) for the number of seconds will prevent the Labor entry screens from timing out and clearing.
Global Auto Indirect Code of Last Resort (Subject to AutoIndirect Source)
When using Auto Indirect Method other than NONE, this is where you set the default Indirect Labor Code for situations when the Employee Master or Sys User record does not have a default entered.
Auto Indirect Method
This prompt has the following options:
- EMP - Populate from Employee Master
- SYS - Populate from Sys User Record
- NONE - Disable Auto Indirect
When Time and Attendance is enabled and Auto Indirect Method is active, the difference between your T & A Clock IN and your first transaction is recorded using this code.
Time and Attendance Enabled
Check the box to enable Time and Attendance Reporting. NovoRoi Systems recommends not enabling this prompt.
Transaction Facility Code Source
This prompt has the following options:
- Use SYS USER Home/Current facility
- Use Employee Master Facility Code
- Use Transaction Key (Work Order, Indirect Labor Code)
The Facility Code Source assigned for all Labor transactions is selected based on the option chosen.
Prompt for Work Center in Direct Labor Entry
This check box enables the Work Center prompt on the Direct Labor screen.
Warn user if TA in transaction was more than X hours ago (0 disables)
Enter the number of hours between transactions that will trigger the warning. Setting this at 0 hours will disable the warning.
Enable Labor Efficiency Prompt in Direct Labor
This check box enables the Labor Efficiency Prompt on the Direct Labor screen.
Enable LI Transaction in Advanced Wip Tote Picking
This checkbox enables Automatic Indirect Labor for the Advanced Wip Tote Picking function.
Require previous seq complete
Toggle this checkbox to require that each sequence for a work order is complete before a user can move to the next sequence to record labor.
Use Multiple Out Time Calculation Method
This prompt controls how time is calculated for Use Multiple Employees who are clocked in to more than one work order at a time. This setting has the following options:
- Even - Spread time evenly to all work orders
- Allocate - Spread time based on work order total time clocked in
This setting only applies to Use Multiple employees when they are clocked in to multiple work orders.
The UseMultiple Labor Setting
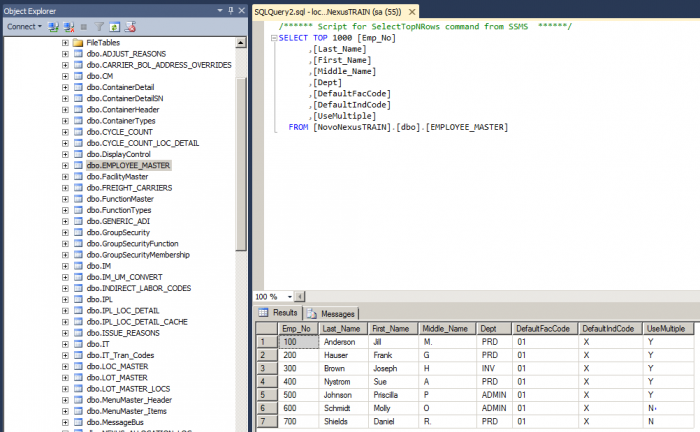
The Use Multiple setting for Labor allows for a user to be logged into more than one work order at a time. This can be set to a default of yes or no via the Nexus Employee Master Schema. You can also individually set the flag for each user by modifying the EM.MAINT screen in M2k to flag individual users to be able to Use Multiple. You can view your settings in the Employee_Master table in SQL:
- Y (or no entry for the setting, which displays as null) = Use Multiple is turned on for that user
- N = Use Multiple is turned off
- PLEASE NOTE: The “N” should be a capital N
Directions on how to use Indirect and Direct Labor in NovoNexus with the UseMultiple setting turned off and with the UseMultiple setting turned on is detailed in subsequent sections here.
Time Clock
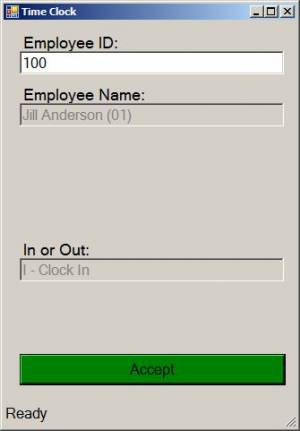
The Time Clock Function records Time and Attendance for an employee. The employee's time is recorded based on the server timestamp.
Please note: Time and Attendance must be turned on in Labor Constants in order to access this function.
Employee ID
Enter Employee ID (Employee Number from Employee Master)
Employee Name
The Employee Name will pre-fill once the Employee ID is entered.
In or Out
The In or Out field will pre-fill based on the employee's current status.
- If the employee is currently clocked out, the In or Out field will pre-fill with I - Clock In to clock the employee in.
- If the employee is currently clocked in, the In or Out Field will pre-fill with O - Clock Out to clock the employee out.
Accept
Hit <enter> to complete the transaction.
Time Clock (Supervisor)
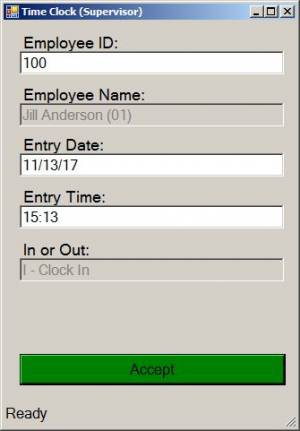
The Supervisor Mode for Time Clock allows a supervisor to enter a time clock transaction for the employee, choosing the exact date and time that will be recorded.
Please note: Time and Attendance must be turned on in Labor Constants in order to access this function.
Employee ID
Enter Employee ID (Employee Number from Employee Master).
Employee Name
The Employee Name will pre-fill once the Employee ID is entered.
Entry Date
This field will pre-fill with the current date. The supervisor may change this date as needed. Hit <enter> to accept the date entered.
Entry Time
After hitting <enter> to accept the date, the Entry Time field will pre-fill with the current time. The supervisor may change this time as needed.
In or Out
The In or Out field will pre-fill based on the employee's current status. Hit <enter> to accept.
- If the employee is currently clocked out, the In or Out field will pre-fill with I - Clock In to clock the employee in.
- If the employee is currently clocked in, the In or Out Field will pre-fill with O - Clock Out to clock the employee out.
Accept
Hit <enter> or click on Accept to complete the transaction.
NovoNexus Labor without UseMultiple
When Indirect and Direct Labor transactions are entered without the UseMultiple setting turned on for a user, the user will log IN to the first transaction of the day, log OUT of the first transaction of the day, and then will only log OUT of transactions for the remainder of the day. The NovoNexus system will use the previous log out time to calculate the total time recorded on the next transaction.
Here is a brief summary of NovoNexus Labor flow when UseMultiple is set to N (NO) for a user:
- User enters an IN transaction to an Indirect Labor Code or a Direct Labor Work Order. (The default is to allow only an IN transaction at the start of the day.)
- User enters an OUT transaction for the Indirect Labor Code or Direct Labor Work Order entered in step 1.
- User then starts the next Indirect Labor session or Direct Labor Work Order session, but does not enter a transaction at this time.
- User enters an OUT transaction when done with the Indirect Labor session or Direct Labor Work Order session in step 3.
- User continues to follow steps 3-4, entering OUTs only until the end of the day.
- When entering the last OUT of the shift at the end of the day, the user will enter an OUT transaction and will clock out of the NovoNexus Labor system by entering a Y in the field Clock Out EOD (End of Day).
Please Note: For the first entry of the day, the In or Out box should default to I - IN and be greyed out. An I - IN is the default as the first entry of the day must always be an IN transaction. If the first transaction of the day defaults to O - OUT, the user didn't Clock out EOD at the end of the previous shift. A supervisor will need to fix this.
Indirect Labor without UseMultiple
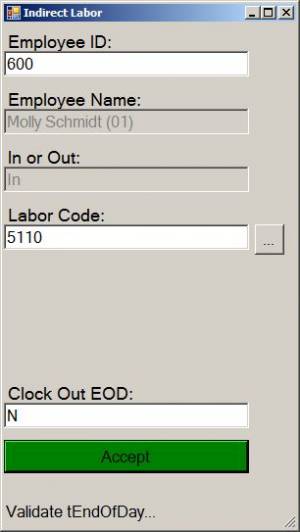
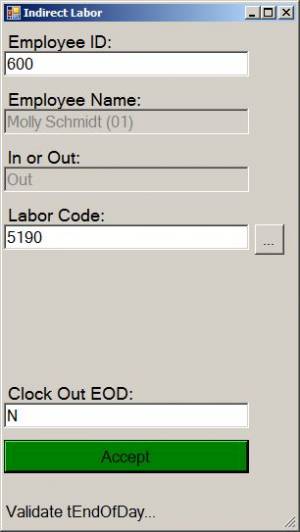
Employee ID
Enter Employee ID (Employee Number from Employee Master).
Employee Name
The Employee Name will pre-fill once the Employee ID is entered.
In or Out
The In or Out field will pre-fill based on the employee's current Labor status. Hit <enter> to accept.
- If this the first Labor log in of the day for the user, the In or Out field will pre-fill with IN to log the employee in to the Indirect Labor Code entered in the next step.
- If this is the first Labor log out of the day for the user, the In or Out field will pre-fill with OUT to log the employee out of the previously entered Indirect Labor Code.
- After the first IN / OUT set of Labor transactions for the day, the user will only need to clock OUT of Indirect Labor Codes for the rest of the day. The In or Out field will pre-fill with OUT to record the Labor time since the last log out.
Labor Code
Enter the Indirect Labor Code and hit <enter>. If this is the first OUT for the day for the user, the user must log out of the same Indirect Labor Code entered when the user logged in. In this situation, the Labor Code will pre-fill with the Labor Code entered when the user logged in.
Please note: You may click on the ellipses box to look up Indirect Labor Codes.
Clock out EOD
Enter N for Clock out EOD (End of Day) if this is NOT the final log out of the day.
Enter Y for Clock out EOD (End of Day) if this IS the final log out of the day.
Accept
Hit <enter> or click on Accept to complete the transaction.
Direct Labor without UseMultiple
Please Note: If the first labor transaction of the day for a user was an Indirect Labor transaction, then Steps 1 & 2 of Direct Labor without UseMultiple can be skipped. The user will have already established a first IN/OUT for the day when clocking IN and then OUT of the Indirect Labor. transaction. The user can proceed to Step 3 and continue to clock OUT of work orders and/or Indirect Labor throughout the day.
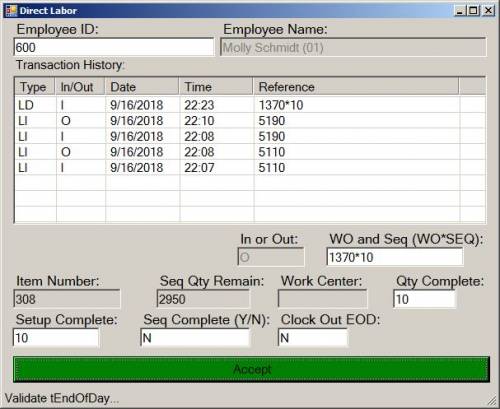
Step 1: Clock IN to the first work order of the day
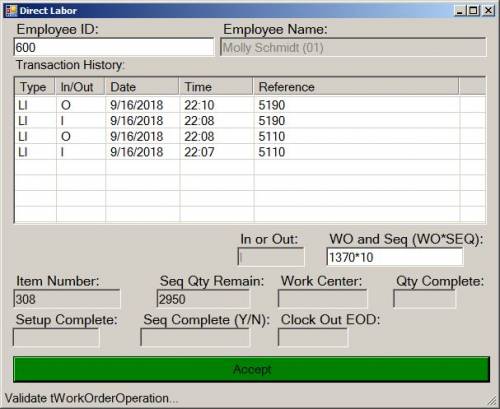
Employee ID
Enter the Employee ID (Employee Number from Employee Master).
Employee Name
The employee name will pre-fill into this field.
Transaction History
Recent labor transaction history will display here for reference.
In or Out
Check to make sure In or Out displays an I for IN. If the first transaction of the day defaults to O - OUT, the user didn't Clock out EOD at the end of the previous shift. A supervisor will need to fix this.
WO and Seq (WO*SEQ)
Enter the Work Order Number and Sequence into the WO and Seq (WO*SEQ) field, using the format WO*SEQ, which consists of the work order number, asterisk, and sequence number. For example, 1370*10
Accept
Hit <enter> or click on Accept to clock in to the work order.
The user is now clocked in to the work order. The user can be performing setup or working directly on the work order.
Step 2: Clock OUT of the first work order of the day
When the user is done with this work order and ready to move to the next work order, they will clock out of the first work order.
Employee ID
Enter the Employee ID (Employee Number from Employee Master).
Employee Name
The employee name will pre-fill into this field.
Transaction History
Recent labor transaction history will display here for reference, updated now with the current WO*SEQ.
In or Out
On this first clock OUT for the day, the In or Out field will default to O for OUT and be greyed out.
WO and Seq (WO*SEQ)
Enter the first Work Order Number and Sequence into WO and Seq (WO*SEQ). If any other WO*SEQ is entered, you will receive an error message.
Qty Complete
Enter quantity completed (must be a number, 0 or higher).
Setup Complete
Enter setups completed (must be a number, 0 or higher).
Seq Complete (Y/N)
Enter a Y for Yes or an N for No.
Clock out EOD
Enter N for Clock out EOD (End of Day).
Accept
Hit <enter> or click on Accept to clock out of the work order.
Step 3: Start the second work order of the day
After the first clock IN and clock OUT for the day, the user will start the next work order after clocking out of the first one but will not enter a transaction at this time. Now that an IN and OUT have been recorded for the day all the subsequent OUTs will use the previous OUT to calculate the time on a work order.
Please Note: The user can alternate Indirect labor with Direct Labor with only clock outs until the end of the day.
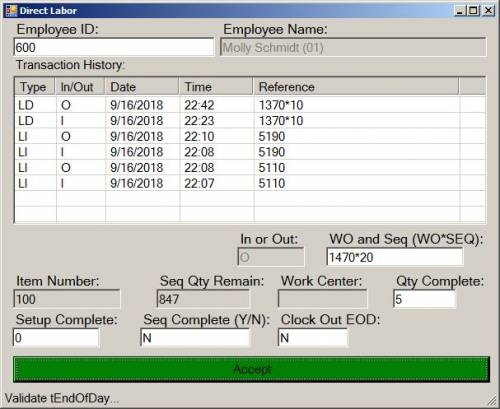
Step 4: Clock OUT of the second work order of the day
Employee ID
Enter the Employee ID (Employee Number from Employee Master).
Employee Name
The employee name will pre-fill into this field.
Transaction History: Recent labor transaction history will display here for reference.
In or Out
Now that the first clock IN and Clock OUT of the day has been established, the In or Out field will default to O for OUT and be greyed out.
WO and Seq (WO*SEQ)
Enter the second Work Order Number and Sequence into the WO and Seq (WO*SEQ) field, using the format WO*SEQ, which consists of the work order number, asterisk, and sequence number. For example, 1470*20
Qty Complete
Enter quantity completed (must be a number, 0 or higher).
Setup Complete
Enter setups completed (must be a number, 0 or higher).
Seq Complete (Y/N)
Enter a Y for Yes or an N for No.
Clock out EOD
Enter N for Clock out EOD (End of Day).
Accept
Hit <enter> or click on Accept to clock out of the work order.
Step 5: Continue to clock OUT of work orders throughout the day
The user will continue to follow steps 3-4, entering only OUTs until the end of the day.
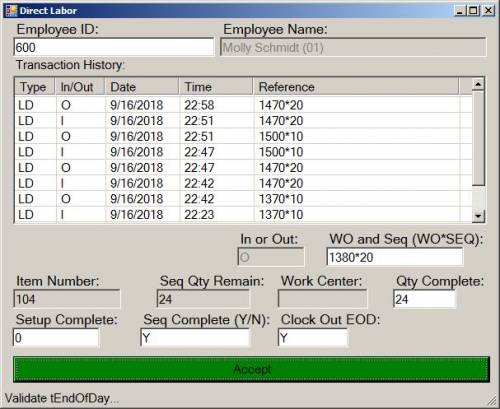
Step 6: Clock OUT at the end of the day
At the end of the day when all work is complete, the user will clock out of the last work order by entering the last work order number in WO and Seq (WO*SEQ) and entering a Y for Clock out EOD (End of Day). This action will clock the user out of the final work order and set up Novo Labor to accept an “In” entry on the next work day.
Employee ID
Enter the Employee ID (Employee Number from Employee Master).
Employee Name
The employee name will pre-fill into this field.
Transaction History
Recent labor transaction history will display here for reference.
In or Out
The In or Out field will default to O for OUT and be greyed out.
WO and Seq (WO*SEQ)
Enter the last Work Order Number and Sequence into the WO and Seq (WO*SEQ) field, using the format WO*SEQ, which consists of the work order number, asterisk, and sequence number. For example, 1380*20
Qty Complete
Enter quantity completed (must be a number, 0 or higher).
Setup Complete
Enter setups completed (must be a number, 0 or higher).
Seq Complete (Y/N)
Enter a Y for Yes or an N for No.
Clock out EOD
Enter Y for Clock out EOD (End of Day).
Accept
Hit <enter> or click on Accept to clock out of the work order and to Clock out EOD (End of Day).
A Note About Setups
If you need to record setup time on a work order separate from the time spent working directly on the work order, you can have the employee clock out of setup separately from the time spent working directly on the work order:
Clock Out of Setups
Employee ID
Enter the Employee ID (Employee Number from Employee Master).
Employee Name
The employee name will pre-fill into this field.
Transaction History: Recent labor transaction history will display here for reference.
In or Out
The In or Out field will default to O for OUT and be greyed out.
WO and Seq (WO*SEQ)
Enter the WO and Seq (WO*SEQ) that is the same for both the setup and work that will follow
Qty Complete
Enter “0” for Qty Complete
Setup Complete
Enter Setup Complete (must be a number, 1 or higher)
Seq Complete (Y/N)
Enter a Y for Yes or an N for No.
Clock out EOD
Enter N for Clock out EOD (End of Day)
Accept
Hit <enter> to Accept
The user can then continue with work on this work order, clocking OUT of alternating setups and corresponding WO*SEQs per the regular procedure when done.
NovoNexus Direct Labor with Use Multiple
Please Note: See the UseMultiple Labor Setting section above for the proper setup for Use Multiple employees.
When entering Direct Labor with the UseMultiple setting turned on for a user, the user with start the day by clocking IN to a work order. The user can continue to work on just this work order, or clock into additional work orders to record labor on two or more work orders at the same time. Time recorded for multiple work orders will be recorded based on how the Use Multiple Out Time Calculation Method is set in the Labor constants, either being split evenly between all work orders or allocated between work orders based on total time clocked in to each work order.
Here is a brief summary of the Direct Labor flow, for when UseMultiple is set to Y (YES) for a user:
- User enters an IN transaction to a work order.
- User enters either an OUT transaction for the same work order entered in step 1, or enters another IN transaction to be in multiple work orders at the same time.
- User can continue to enter IN transactions into new work orders for multiple work orders at the same time, or can enter OUT transactions when done with one or more work orders.
- When entering the last OUT at the end of the day, the user will enter an OUT transaction, and will clock out of the Labor system either by entering a Y in the field Clock out EOD (End of Day) if it is a single OUT transaction, or by checking the box for Clock out EOD (End of Day) for a Multi OUT transaction.
Please Note: UseMultiple may be used for multiple orders at a time in Direct Labor only. Indirect Labor can be used with only one Indirect Labor Code at a time. If a UseMultiple user needs to clock in to Indirect Labor, the user will need to clock out of all Direct Labor work orders first.
Please note: With Use Multiple turned on for this user, the In or Out box does not default to an In. You will need to complete this field with an I for the first IN transaction of the day.
Current status: The field called Transaction History that is used when a user does NOT have Use Multiple turned on is now called Current Status. The Current Status field is used when Use Multiple is turned on so the user can track all the open work orders they are clocked into at one time.
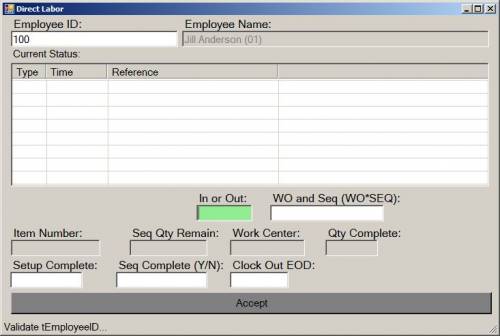
Step 1. Enter the first work order of the day
Employee ID
Enter the Employee ID (Employee Number from Employee Master).
Employee Name
The employee name will pre-fill into this field.
Current Status
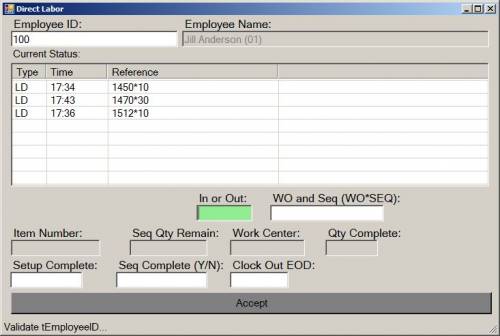
Any work orders the user is currently clocked in to will display here for reference. On a fisrt clock in of the day, this field should be empty.
In or Out
Enter an I into the In or Out field.
WO and Seq (WO*SEQ)
Enter the Work Order Number and Sequence into the WO and Seq (WO*SEQ) field, using this format: WO*SEQ, which consists of the work order number, asterisk, and sequence number. For example, 1450*10
Accept
Hit <enter> or click on Accept to clock in to the work order.
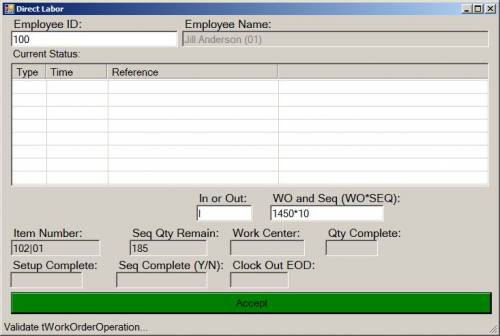
Step 2. Enter another work order for multiple work orders at the same time
Employee ID
Enter the Employee ID (Employee Number from Employee Master).
Employee Name
The employee name will pre-fill into this field.
Current Status
The Current Status field will display the 1st open work order here for reference.
In or Out
Enter an I into the In or Out field.
WO and Seq (WO*SEQ)
Enter the new Work Order Number and Sequence into the WO and Seq (WO*SEQ) field, using this format: WO*SEQ, which consists of the work order number, asterisk, and sequence number. For example, 1512*10
Accept
Hit <enter> or click on Accept to clock in to the work order.
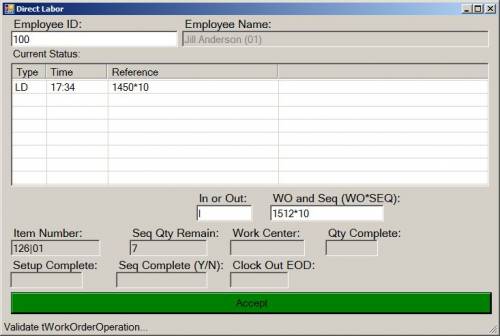
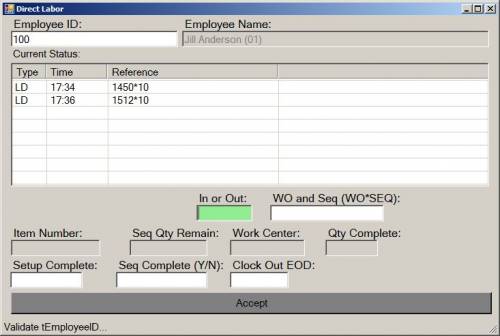
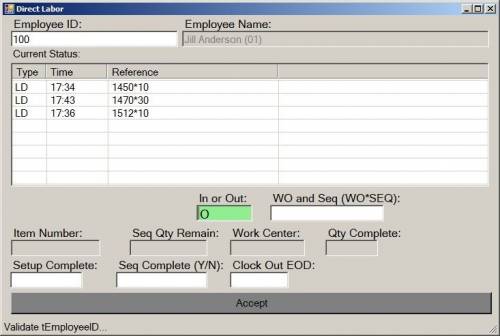
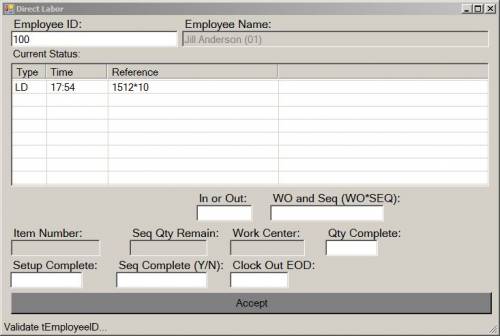
The user is now logged into two work orders. Entering the Employee ID will allow the user to see current status:
The user can continue to clock into multiple work orders:
Step 3a: Clock out when logged in to one work order
Employee ID
Enter the Employee ID (Employee Number from Employee Master).
Employee Name
The employee name will pre-fill into this field.
Current Status
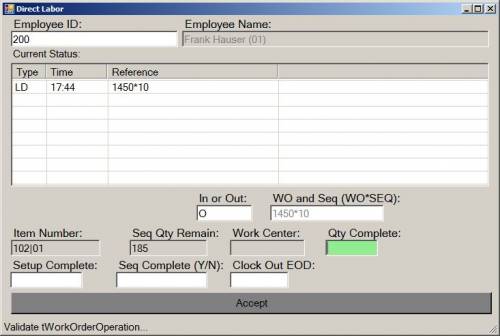
The Current Status field will display the open work order here for reference.
In or Out
Enter an O into the In or Out field.
WO and Seq (WO*SEQ)
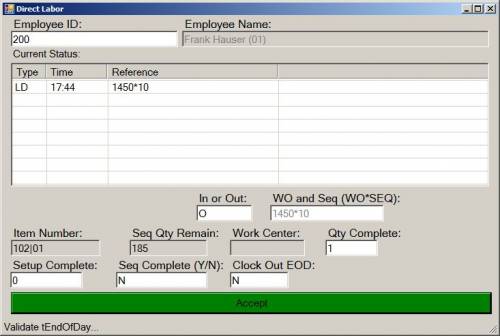
If there is only one work order open for the user when clocking out (as shown above), the WO and SEQ (WO*SEQ ) field will default to the current (and only) work order.
Qty Complete
Enter Qty Complete (must be a number, 0 or higher).
Setup Complete
Enter Setup Complete (must be a number, 0 or higher).
Seq Complete (Y/N)
Enter a Y for Yes or an N for No.
Clock out EOD
Enter N for Clock out EOD (End of Day).
Accept
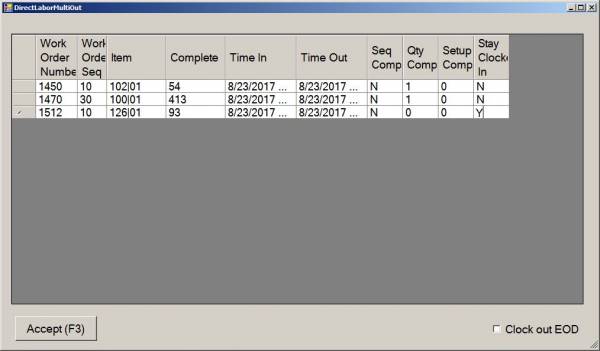
Step 3b: Clock out when logged in to more than one work order
Employee ID
Enter the Employee ID (Employee Number from Employee Master).
Employee Name
The employee name will pre-fill into this field.
Current Status
The Current Status field will display all open work orders here for reference.
In or Out
Seq Comp (Y/N)
For each work order listed, enter a Y for Yes or an N for No.
Qty Comp
For each work order listed, enter quantity completed (must be a number, 0 or higher).
Setup Comp
For each work order listed, enter setups completed (must be a number, 0 or higher).
Stay Clocked In
- Enter an N for Stay Clocked In for any work order you would like to clock OUT of at this time.
- Enter a Y for Stay Clocked in for any work orders you would like to stay IN to at this time.
Clock out EOD
DO NOT toggle this box! (It is not time to clock out end of day yet.)
Accept
Hit <enter> or click on Accept to clock out of the selected work orders.
Enter the Employee ID to see the current status of any remaining work open work orders:
The user may continue with any current work orders and/or clock in to additional work orders.
Step 4. Clock OUT at the end of the day
At the end of the day when all work is complete, and ONLY at the end of the day, the user will clock out of the last work order either by entering a Y in the field Clock out EOD (End of Day) if it is a single OUT transaction, or by checking the box for Clock out EOD (End of Day) for a Multi OUT transaction. This action will clock the user out of the final work order and set up Novo Labor to start with an IN transaction at the start of the next work day.
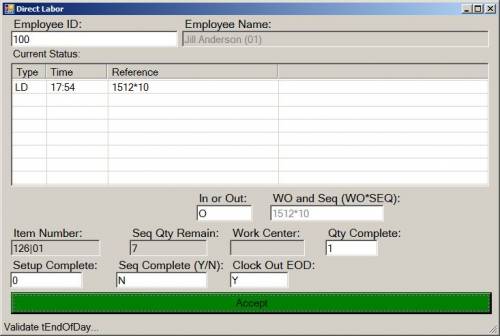
Single Out Transaction at End of Day - If there is only one work order open for the user when clocking out, the regular screen will be used to clock out.
Employee ID
Enter the Employee ID (Employee Number from Employee Master).
Employee Name
The employee name will pre-fill into this field.
Current Status
The Current Status field will display the open work order here for reference.
In or Out
Enter an O into the In or Out field.
WO and Seq (WO*SEQ)
If there is only one work order open for the user when clocking out (as shown above), the WO and SEQ (WO*SEQ ) field will default to the current (and only) work order.
Qty Complete
Enter Qty Complete (must be a number, 0 or higher).
Setup Complete
Enter Setup Complete (must be a number, 0 or higher).
Seq Complete (Y/N)
Enter a Y for Yes or an N for No.
Clock out EOD
Enter Y for Clock out EOD (End of Day).
Accept
Hit <enter> or click on Accept to Clock Out EOD of the work order.
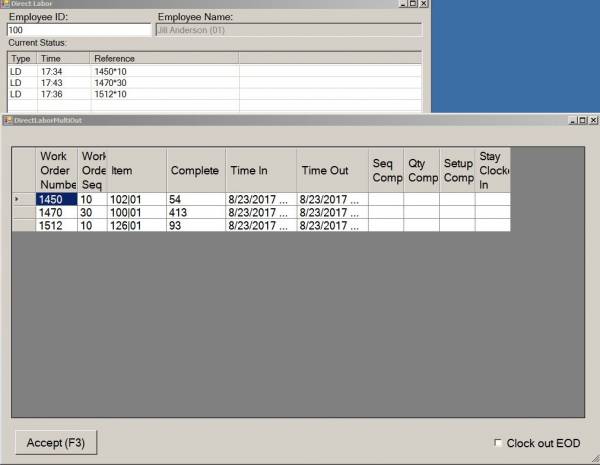
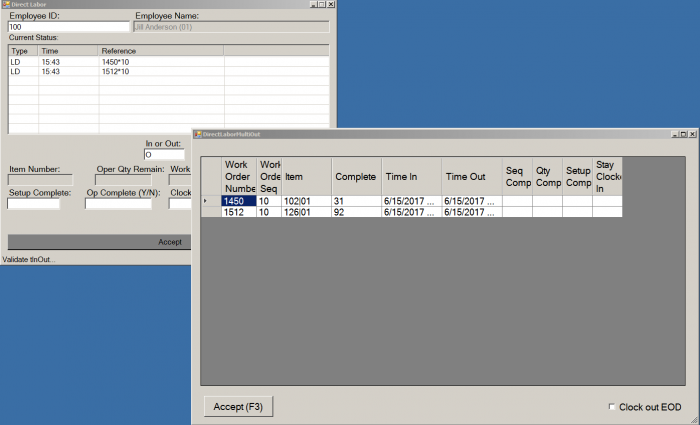
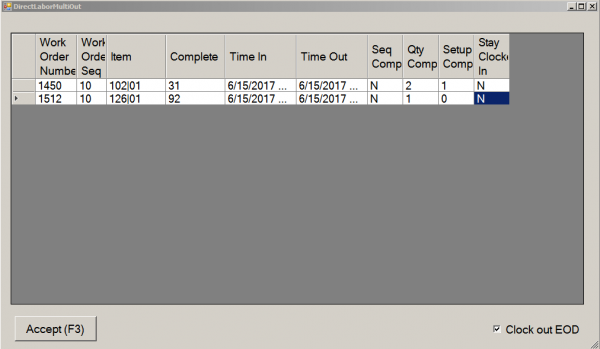
Multi Out Transaction at End of Day - If there are multiple work orders open when clocking out, a new window will open called DirectLaborMultiOut:
Employee ID
Enter the Employee ID (Employee Number from Employee Master).
Employee Name
The employee name will pre-fill into this field.
Current Status
The Current Status field will display all open work orders here for reference.
In or Out
Seq Comp (Y/N)
For each work order listed, enter a Y for Yes or an N for No.
Qty Comp
For each work order listed, enter quantity completed (must be a number, 0 or higher).
Setup Comp
For each work order listed, enter setups completed (must be a number, 0 or higher).
Stay Clocked In
Enter an N for all work orders.
Clock out EOD
Click in the box to toggle and activate Clock out EOD.
Accept
Hit <enter> or click on Accept to clock out of the selected work orders.
Maintain Automatic Schedules
The Maintain Automatic Schedules function is for setting up automatic Clock OUT and Clock IN events for breaks and End of Shift clock outs. This feature is for use with Use Multiple Employees only.
Please Note: Adding new automatic schedules, deleting automatic schedules, and making changes to Automatic Schedules should be done during off hours to avoid disruption to the processing of automatic schedules during production hours.
Please Note: This feature requires additional setup outside of the NovoNexus PC Client, as well as special training and understanding of how it will impact Labor recording and reporting in your ERP system. Please contact NovoRoi Systems for information and support before attempting to implement this feature.
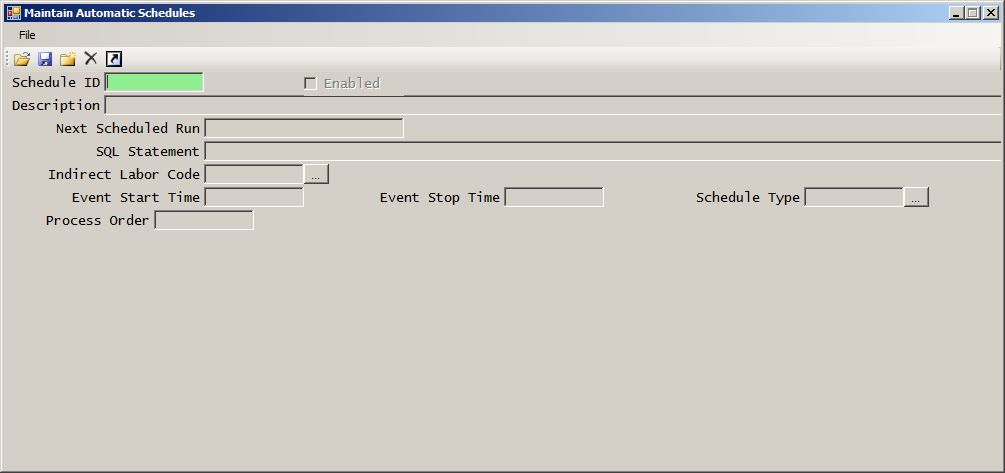
To create a new record, open the Maintain Automatic Schedules function. A blank Automatic Schedules screen will open.
Click on the New icon ![]() , or select File→New from the File Menu
, or select File→New from the File Menu
Schedule ID
Tab through this field to allow the system to use next numbering. The next number will populate this field upon saving the record.
Enabled
Toggle this check box to enable the new Automatic Schedule record. If you are not ready to enable it, you can leave the field un-toggled. However, remember to return later to enable the Automatic Schedule record when ready.
Please note: Do not enable an automatic schedule to run until you are fully ready to implement and run automatic schedules.
Description
Enter your description of the schedule.
Next Scheduled Run
Enter the date/time the ADI Service should run the task next. This field is required, so you will need to enter a day and time to save the record.
The date and time should be entered in the following format: 3/17/2024 10:00:00 AM
Important to Note:
- If you are not ready to go-live with this function, enter a date in the past to be able to save the record.
- Once you enable the schedule and are ready to go-live with the function, The Next Scheduled Run will need to be updated to the actual next run date and time.
SQL Statement
Enter The SQL statement that will return valid results in a SQL View for EmployeeID, TranType, TranKey, TranInTime, and TranInDate. The standard View is View_Get_Active_Labor_Employees. You can use the example below as a template:
SELECT * FROM View_Get_Active_Labor_Employees WHERE TranType = 'LD'
The specifics in your SQL SELECT statement will vary, depending the type of Labor transaction the schedule is for and if you have a custom View.
Indirect Labor Code
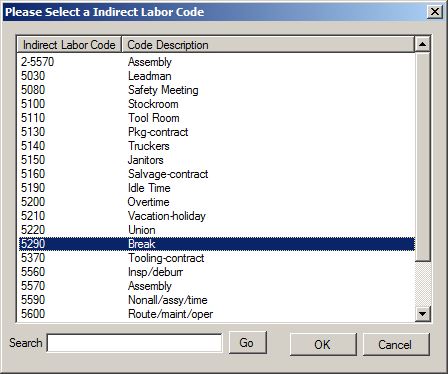
Enter the Indirect Labor Code to use for the Automatic Break Schedule. Click on the ellipsis menu to open the selection box. Select the appropriate Indirect Labor Code from the drop down box and click OK.
Please Note: As this field is required, you will need to enter an Indirect Labor Code for an Automatic Clock Out schedule type, even though in Indirect Labor Code won't be used. Select any one from your system to be able to save the record.
Event Start Time
Enter the start time for your scheduled event. This will either be the start of a scheduled break or the time for an End of Shift Clock OUT event.
Please Note: The date and time should be entered using a 24 hour clock format that includes the hour, minutes and seconds. For example, enter 10:00:00 for 10 AM, or enter 16:30:00 for 4:30 PM.
Event Stop Time
Enter the stop time for your scheduled event. This will either be the stop time of a scheduled break or the time for an End of Shift Clock OUT event. The stop time entered for an End of Shift Clock OUT event will be the exact same time as the start time for the event.
Please Note: The date and time should be entered using a 24 hour clock format that includes the hour, minutes and seconds. For example, enter 10:00:00 for 10 AM, or enter 16:30:00 for 4:30 PM.
Schedule Type
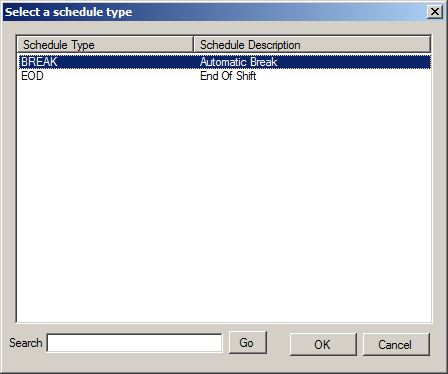
Enter the type of schedule for the event, which will be either a Break - Automatic Break or an EOD - End of Shift. Click on the ellipsis menu to open the selection box. Select the appropriate schedule type from the drop down box and click OK.
Process Order
Enter a number in this field to indicated process order. The value in the Process Order field establishes the order in which the scheduled event should happen in relation to all of the other automatic schedules. The process order should align with the time of day the scheduled event happens. For example, the first event of the day should be set to 1, the second event of the day should be set to 2, the third event of the day should be set to 3, etc.
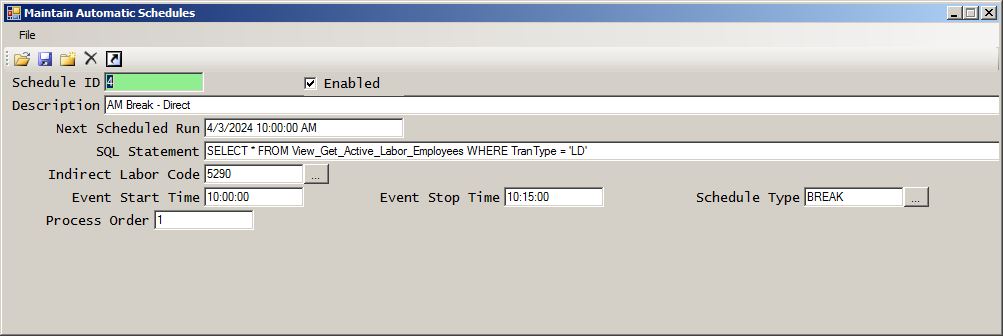
Below is an example of a completed Automatic Schedule for a Break that happens at 10 AM:
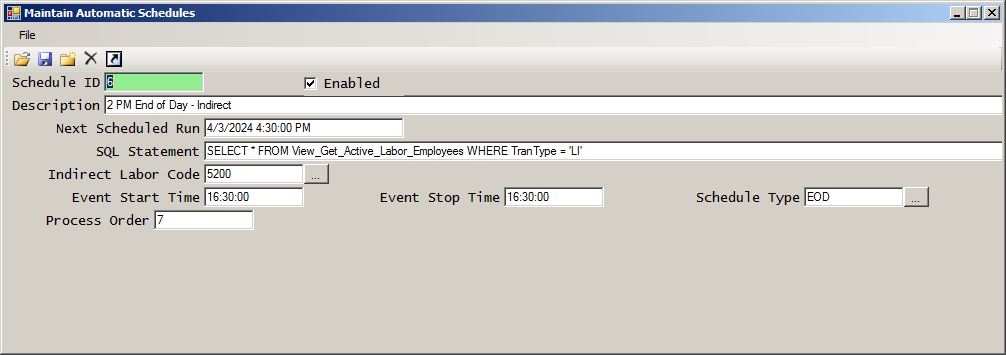
Below is an example of a completed Automatic Schedule for an End of Shift that happens at 4:30 PM:
Indirect Labor (Supervisor Mode)

