Table of Contents
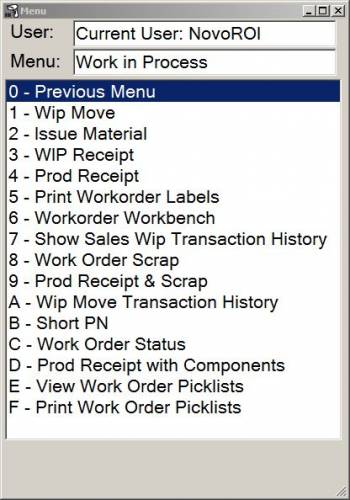
Work in Progress
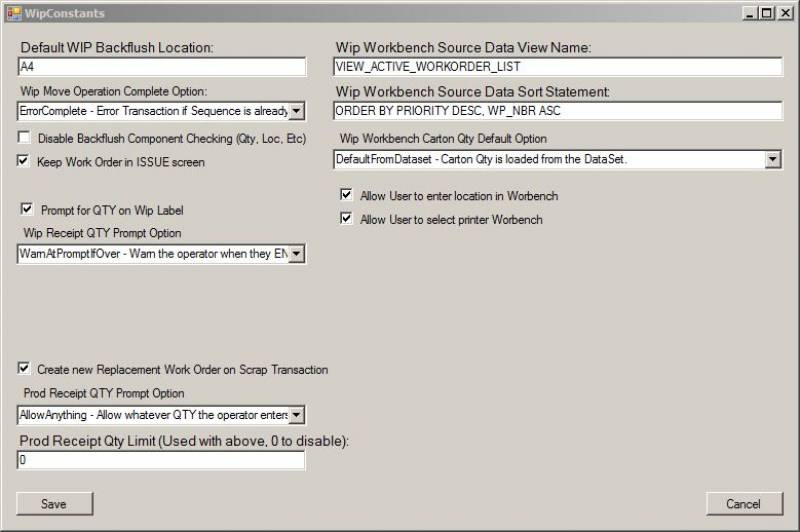
WIP Constants
Default WIP Backflush Location
If no location is defined at the component level for your workorders, enter the default location for component backflush here. Please note: If this field is left empty, then the Disable Backflush Component Checking constant should also be toggled to disable backflush component checking.
Wip Move Operation Complete Option
The following options control the user's ability to complete a sequence when it is already completed:
- Allow Complete – Allow Any Sequence Complete Transaction
- Warn Complete - Warn if sequence already complete
- Error Complete – Error Transaction if sequence is already complete
Disable Backflush Component Checking (Qty, Loc, etc.)
During the WIP Receipt transaction the component availability is verified. Toggle this checkbox to disable this functionality. Please note: If there is no value entered for the Default WIP Backflush Location, this box should be toggled to disable the backflush component checking and avoid errors with processing work orders in NovoNexus.
Keep Work Order in ISSUE Screen
Toggle this constant to keep the same work order number in the Work Order field of the Issue transaction until the work order number is changed. This feature allows the user to more quickly issue all of the components on a work order without having to re-enter the work order number each time.
Prompt for QTY on WIP Label
Toggle this checkbox to enable the quantity field on the Print Workorder Labels function.
Wip Receipt QTY Prompt Option
The following options control the user's ability to over-receive a Wip Receipt quantity:
- Allow Anything - Allow whatever the QTY the operator enters into this prompt
- WarnAtPromptIfOver - Warn the operator when they ENTER the QTY if it is over the remaining balance
- BlockAcceptance - Do not accept a QTY that is over the remaining balance
Create New Replacement Work Order on Scrap Transaction
This constant can be enabled along with custom functionality to automatically create a new work order when the Work Order Scrap function is used. Toggle the box to enable.
Prod Receipt QTY Prompt Option
This constant controls the use of limits on the quantity entered in the Prod Receipt transaction. It works in conjunction with the limit set in the Prod Receipt QTY Limit constant. Any limit set is a per transaction limit. The options for this constant are as follows:
- AllowAnything – Allow whatever QTY the operator enters into the prompt
- WarnAtPromptIfOver - Warn the operator when they ENTER the QTY if it is over the limit
- BlockAcceptance – Do not accept a QTY that is over the limit
Prod Receipt QTY Limit
This setting is used with the Prod Receipt QTY Prompt Option to set a limit on quantity entered per transaction in the Prod Receipts function. To disable the limit, enter a zero in this field.
Wip Workbench Source Data View Name
Use this constant to override the standard display in the Workorder Workbench function. VIEW_ACTIVE_WORKORDER_LIST is the default view.
Wip Workbench Source Data Sort Statement
Use this constant to override the sort order in the Workorder Workbench function. ORDER BY PRIORITY DESC, WP_NBR ASC is the default sort.
Wip Workbench Carton Qty Default Option
This constant controls how the Cartons field on the Workbench is filled. The three options for this field are as follows:
- DefaultFromDataset- Carton Qty is loaded from the DataSet (i.e. the user enters the value manually)
- DefaultToWip - Carton Qty is loaded from the WipQty prompt (i.e. the value will auto fill with the same quantity entered in the Wip Qty field.
- Skip - Skip Carton Qty Prompt (i.e. the field will be greyed out and skipped)
Allow User to enter location in Workbench
Toggle this checkbox to allow the user to override the default Wip Location. If enabled, the user will be able to change the default Wip location.
Allow User to select printer Workbench
Toggle this checkbox to allow the user to change the printer for printing the Wip labels. If enabled, a drop down box of eligible printers will allow the user choose a printer other than their default printer.
WIP Move
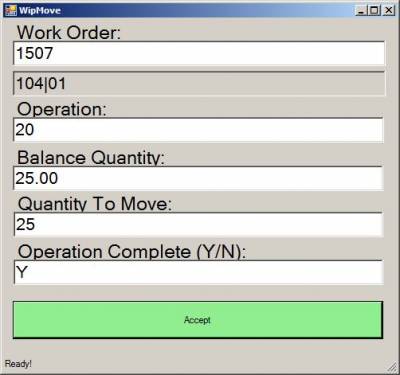
This function moves material from one work order sequence to another. No inventory updates are performed.
Work Order
Enter the work order number. Once the work order number is entered, the item number will display in the informational field below it.
Operation
Enter the operation/sequence.
Please Note: Entering the work order number and operation combination into the Work Order field, using the format Work Order*Operation (for example 1507*20), will automatically place the numbers in the correct fields. This can be done either manually or by scanning a barcode that has the Work Order*Operation number in it.
Balance Quantity
The balance, or quantity remaining for that work order and operation will display in this informational field.
Quantity
Fill in the quantity to move.
Operation Complete
Use this field to set the complete flag on the sequence.
- Enter an N for no if the quantity entered to move does not meet or exceed the required quantity for the work order.
- Enter a Y for yes if the quantity entered to move does meet or exceed the required quantity for the work order.
Issue Material
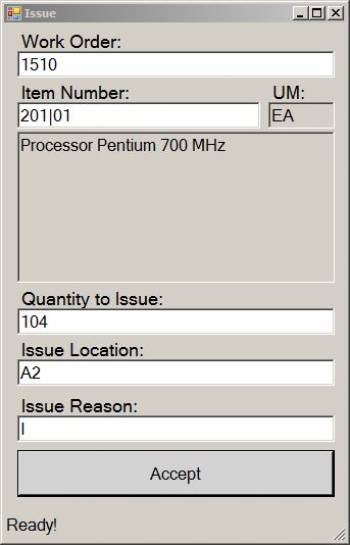
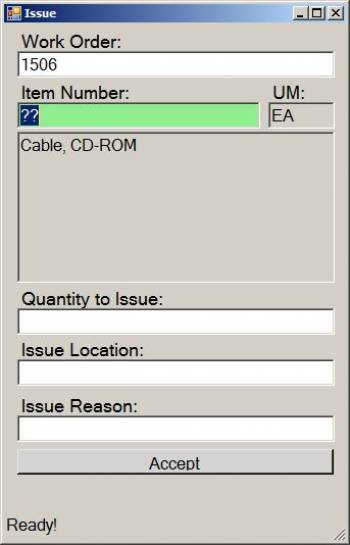
This function mirrors the ISSUE transaction in M2k. It is used to issue specific components to a work order.
Please note: The NovoNexus Issue Material transaction requires the material to be allocated to the work order already.
Work Order
Enter the work order number. If the Keep Work Order in ISSUE screen constant is toggled, the work order number will remain in the Work Order field throughout subsequent transactions until the work order number is changed or the user exits the transaction.
Item Number
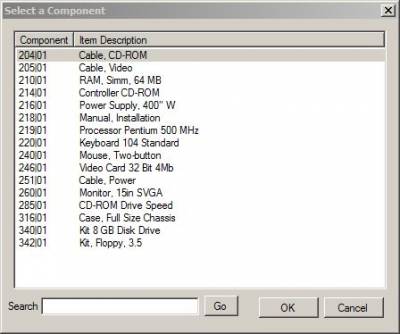
Enter the item number to be issued. If needed, this field has a item lookup available. Entering either ?? or .. into the item number field will pull up a list of components available to issue for the work order. Only items with quantities remaining to be issued will show on this list.
Select the desired component using one of the following methods:
- Use the the arrow keys to maneuver to the correct item number and press the OK button or hit <enter> to proceed.
- Use a keyboard to type in the item number. The correct line for that item number will be highlighted. Press the OK button or hit <enter> to proceed.
- Tap on a touch screen to select the desired item number and press the OK button or hit <enter> to proceed.
- To further refine your search, type the item number into the Search field and press the Go button or hit <enter>. If there is still more than one result displayed, maneuver to the correct work order as detailed above. Press the OK button or hit <enter> to proceed.
Please Note: The long part number or the superseded part number for an item may also be entered into the Item Number field to bring up the results for that item number. For example:
- If 110 is the superseded part number for 100, entering 110 into the Item Number field will bring up results for item 100.
- If 1234567 is the long part number for item 100, entering 1234567 into the Item Number field will bring up results for item 100.
UM
The applicable unit of measure for the item will be displayed here.
Quantity to Issue
Enter the quantity to issue for this item.
Issue Location
Enter the location to which the item will be issued.
If the item being issued is serial tracked or lot traced, entry of serial numbers or lot number will be required after the Issue Location is entered.
Issue Reason
Enter the Issue Reason Code for this transaction. Issue Reason Codes are defined in your ERP system.
Serial Number Entry
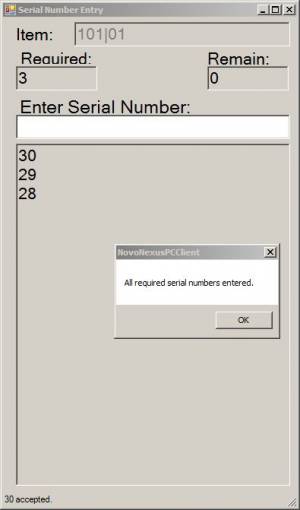
If the item number being issued is serial tracked, the Serial Number Entry screen will open after the Issue Location is entered.
A valid serial number for an item with a status of On Hand must be entered for each item being issued.
Once all serial numbers are entered, the user will be redirected back to the Issue screen to complete the transaction.
Lot Entry
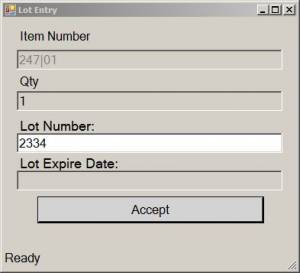
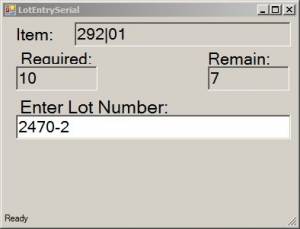
If the item number being issued is lot traced, the Lot Entry screen will open after the Issue Location is entered.
Depending on the Lot Entry Screen Method set in Inventory Constants, one of the following Lot Entry screens will open.
Standard Lot Entry: Enter the lot number for the item being issued. The lot number is entered one time only.
Serial Lot Entry: Enter the lot number once for each quantity of the item being issued.
For example, if there are 10 items being issued, the lot number will need to be entered 10 times.
Once the lot number has been entered and accepted, the user will be redirected back to the Issue screen to complete the transaction.
WIP Receipt
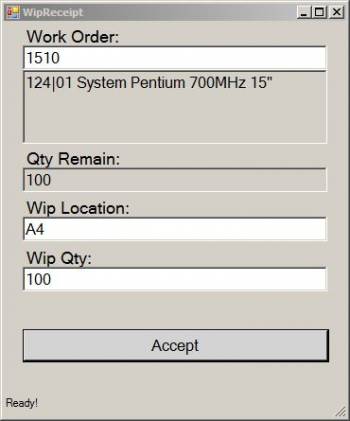
This function mirrors the M2k WIP.RECEIPT transaction. It is used to record receipts to either STOCK or INSEPCT for a work order.
Work Order
Enter work order number.
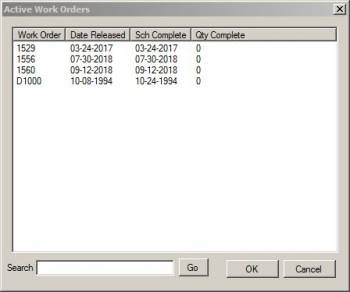
You may also enter an item number into the Work Order field to do a cross reference search for all open work orders for that item number. If you enter an item number, a new screen called Active Work Orders will open with the list of open work orders for the item entered:
The Active Work Orders screen also displays the date released, the scheduled due date, and the quantity already completed for each work order listed.
Select the desired work order number using one of the following methods:
- Use the the arrow keys to maneuver to the correct work order and press the OK button or hit <enter> to proceed.
- Use a keyboard to type in the work order. The correct line for that work order will be highlighted. Press the OK button or hit <enter> to proceed.
- Tap on a touch screen to select the desired work order and press the OK button or hit <enter> to proceed.
- To further refine your search, type the work order number into the Search field and press the Go button or hit <enter>. If there is still more than one result displayed, maneuver to the correct work order as detailed above. Press the OK button or hit <enter> to proceed.
Qty Remain
The quantity remaining on the work order will display in this informational field.
Wip Location
Enter the location for the Wip Receipt.
Please Note: If a Default WIP Backflush location is set in the NovoNexus WIP Constants, this field will automatically populate with the default location.
Hit <tab> or <enter> to accept this default location, or change the location by entering a different one.
Wip Qty
Enter the quantity for the WIP Receipt.
If the item being received is serial tracked or lot traced, entry of serial numbers or lot number will be required after the quantity is entered.
Serial Number Entry
If the item number being received is serial tracked, the Serial Number Entry screen will open after the WIP Qty is entered.
Once all serial numbers are entered, the user will be redirected back to the WIP Receipt screen to complete the transaction.
Lot Entry
If the item number being received is lot traced, the Lot Entry screen will open after the WIP Qty is entered.
Depending on the Lot Entry Screen Method set in Inventory Constants, one of the following Lot Entry screens will open.
Standard Lot Entry: Enter the lot number for the items being received. The lot number is entered one time only.
Serial Lot Entry: Enter the lot number once for each quantity of the item being received.
For example, if there are 10 items being received, the lot number will need to be entered 10 times.
Once the lot number has been entered and accepted, the user will be redirected back to the WIP Receipt screen to complete the transaction.
Prod Receipt
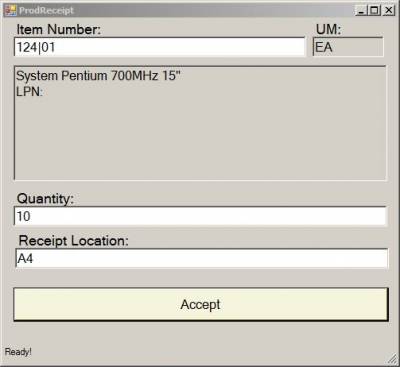
This function mirrors the M2k PROD.RECEIPTS transaction. It allows completion to be recorded against production orders (repetitive manufacturing).
Existing plans are used up in order. This is comparable to the ALL selection for Reference Number in M2k.
Item Number
Enter the item number for the Production Receipt.
Please Note: The long part number or the superseded part number for an item may also be entered into the Item Number field to bring up the results for that item number. For example:
- If 110 is the superseded part number for 100, entering 110 into the Item Number field will bring up results for item 100.
- If 1234567 is the long part number for item 100, entering 1234567 into the Item Number field will bring up results for item 100.
UM
The applicable unit of measure for the item will be displayed here.
Quantity
Enter the quantity to receive for this item.
Receipt Location
Enter the location for the Production Receipt.
Please Note: The default location (set in your ERP system) for this item will automatically populate this field.
Hit <tab> or <enter> to accept this default location, or change the location by entering a different one.
Serial Number Entry
If the item number being received is serial tracked, the Serial Number Entry screen will open after the Receipt Location is entered.
Once all serial numbers are entered, the user will be redirected back to the Prod Receipt screen to complete the transaction.
Lot Entry
If the item number being received is lot traced, the Lot Entry screen will open after the Receipt Location is entered.
Depending on the Lot Entry Screen Method set in Inventory Constants, one of the following Lot Entry screens will open.
Standard Lot Entry: Enter the lot number for the items being received. The lot number is entered one time only.
Serial Lot Entry: Enter the lot number once for each quantity of the item being received.
For example, if there are 10 items being received, the lot number will need to be entered 10 times.
Once the lot number has been entered and accepted, the user will be redirected back to the Prod Receipt screen to complete the transaction.
Print Workorder Labels
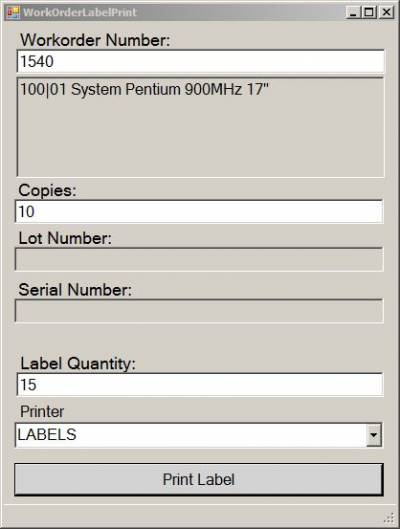
Workorder Number
Enter the work order number
Copies
The number entered here controls how many labels will print.
Lot Number
If the item on the work order is lot traced, this field will be available for the option of entering the item's lot number for printing on the label.
Serial Number
If the item on the work order is serial tracked, this field will be available for the option of entering the item's serial numbers for printing on the label.
Label Quantity
The number entered here will print on the label.
Printer
Select a printer. Printer options are available in the dropdown list.
Print Label Button
Hit the Print Label button to print the labels.
Workorder Workbench
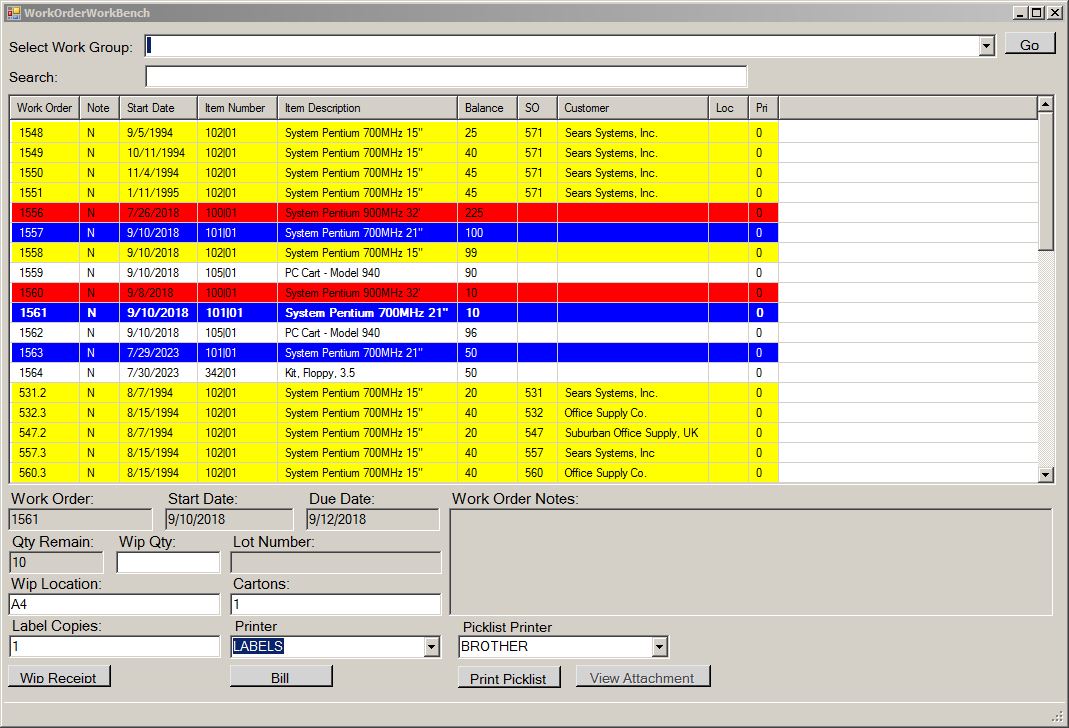
The Workorder Workbench offers a quick way to review and process a group of work orders. This function is a desktop or tablet application only. Any screen smaller than a tablet will not correctly display the Workorder Workbench due to space limitations. The Workorder Workbench does not currently support serial number entry.
The Workorder Workbench can be customized to allow the view to display by Work Order Group, work orders to sort by priority, lines to be color coded by item, and WIP Receipt locations to default to a specific location by work order. These customizations can be made in the ERP system and/or can be manually maintained in the SQL database. Clients interested in utilizing this custom functionality should contact NovoRoi Systems for training and setup assistance.
Select Work Group
Use the selection bar and the GO button at the top of the screen to display a single Work Group or to display all Work Groups in the Workorder Workbench.
- To display all Work Groups in the Workorder Workbench grid, click on the arrow in the selection bar to open a drop down list of Work Groups. Maneuver to ALL GROUPS and highlight the line. Click on the highlighted line or hit the <return> key to display all groups in the Workbench.
- To display a single Work Group, use one of the following methods:
- Click on the arrow in the selection bar to open a drop down list of Work Groups. Maneuver to the desired Work Group using the slide bar or arrow keys. Once the Work Group is highlighted, click on it or hit the <return> key to display it in the Workbench.
- Type the Work Group name or number into the selection bar and then hit either the up or down arrow key to display the Work Group. Please note: If you type in a partial Work Group name or number and hit the up or down arrow key, the result displayed will be the first Work Group that begins with the letter or numbers typed. For example, if there is Work group called 98 and a Work Group called 99, typing a “9” into the selection bar and hitting an up or down arrow key will display Work Group 98.
- Anytime the cursor is in the selection bar, use the up and/or down arrow key to move through the list of available Work Groups.
- To display work orders that do not have an assigned Work Group, leave the selection bar empty and click on the Go button.
- To sort columns, click on the column header
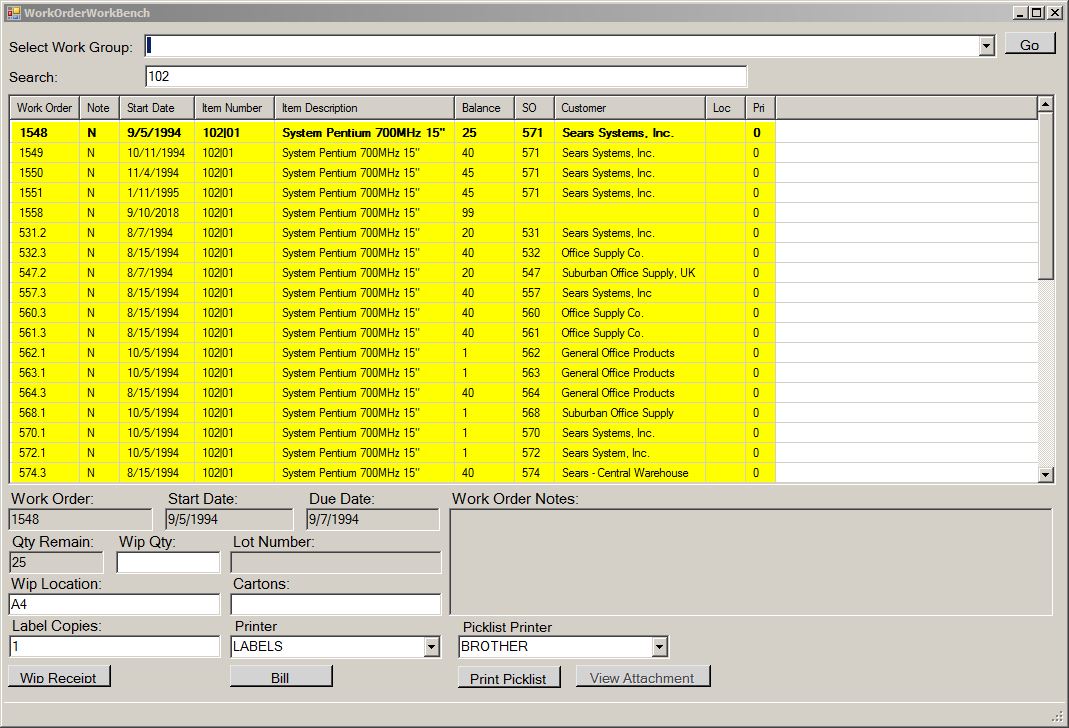
Search
Use the Search box to filter the results on the grid. All columns are searched and results are narrowed as a value is entered into the search box. The workbench search feature is only available on the NovoNexus PC Client version.
Example of a search for Item Number 102:
Workbench Grid
The Workorder Workbench grid displays the active work orders for the selected Work Group using the following columns:
- Work Order number
- Notes: Y means there are notes for the work order (displayed in the lower right corner) and N means there are no notes for this work order.
- Start Date
- Item Number
- Item Description
- Balance remaining on the work order
- Sales Order number
- Customer
- Location (with customization: the default WIP Receipt location for the work order)
- Priority (with customization)
Scroll or use the arrow keys to move between work orders. The selected work order will be highlighted in dark blue on the grid. The columns will automatically resize to fully display the information in the highlighted row.
The Workorder Workbench can be resized by dragging out the lower right-hand corner.
Each of the columns in the Workorder Workbench can be sorted for an ascending or descending listing of the contents of the column. Click on the heading in a column to sort. The workbench sort feature is only available on the NovoNexus PC Client version.
Work Order Notes
Any notes on the selected work order will display in this box.
Work Order
The selected work order number is displayed here.
Start Date
The start date on the work order is displayed here.
Due Date
The due date on the work order is displayed here.
Qyt Remain
The quantity remaining on the work order is displayed here.
Wip Qty
Enter the quantity for the WIP Receipt in this field.
Lot Number
If the item number being received is lot traced, the Lot Entry screen will open after the WIP Qty is entered.
Depending on the Lot Entry Screen Method set in Inventory Constants, one of the following Lot Entry screens will open.
Standard Lot Entry: Enter the lot number for the items being received. The lot number is entered one time only.
Serial Lot Entry: Enter the lot number once for each quantity of the item being received.
For example, if there are 10 items being received, the lot number will need to be entered 10 times.
Once the lot number has been entered and accepted, the user will be redirected back to the Workorder Workbench to complete the transaction.
Wip Location
If customizations are in place to set a default WIP Receipt location by work order, the default WIP Receipt location for the work order will display here. Otherwise, the Default WIP Backflush Location set in the NovoNexus WIP Constants will display.
To override the default Wip Location and allow the user to change the location as needed, the “Allow User to enter location in Workbench” constant must be enabled in the Wip Constants.
Cartons
The functionality of this field will vary depending on how the Wip Constants are set.
- If the Wip Workbench Carton Qty Default Option is set to DefaultfromDataset: Enter the number of cartons. One work order label will print for each carton quantity entered. For example, if 10 is entered for cartons, 10 work order labels will print. Carton quantity will be displayed on the labels to indicate the number of overall cartons. This is a required field. If a zero is entered for carton quantity, no labels will print.
- If the Wip Workbench Carton Qty Default Option is set to DefaultToWip: The Carton quantity will auto fill to match the value entered in the Wip Qty field. One work order label will print for each carton quantity entered. For example, if 10 is entered for cartons, 10 work order labels will print. Carton quantity will be displayed on the labels to indicate the number of overall cartons. Please note: If this constant is enabled, the field will auto fill with what is entered in the Wip Qty field, but the user will be able to override and change the value if needed. This is a required field. If a zero is entered for carton quantity, no labels will print.
- If the Wip Workbench Carton Qty Default Option is set to Skip: The Cartons field will be greyed out and skipped. By default, 1 work order label print. A carton quantity of 1 will be displayed on the label.
Label Copies
Enter the number of copies to print for the work order labels. This field will pre-fill with a value of 1. Enter a different quantity if a value other than 1 is needed.
Printer
The user's default printer (as set in the Edit Users function on the NovoNexus System Admin Menu) will display here. Labels will be sent to this printer.
If the Allow User to select printer Workbench is enabled, the user will be able to choose a printer from a drop down list of available printers. Only B (Barcode) type printers will be available.
Please Note: Label setup with barcode software (such as bartender or Loftware) is required.
View Attachment
The View Attachment feature will render an attachment on the local PC using the default programs per the attachment type. This feature requires set up assistance from NovoRoi Systems with attachment links defined in a custom Workorder Workbench view, and it is only available on the NovoNexus PC Client.
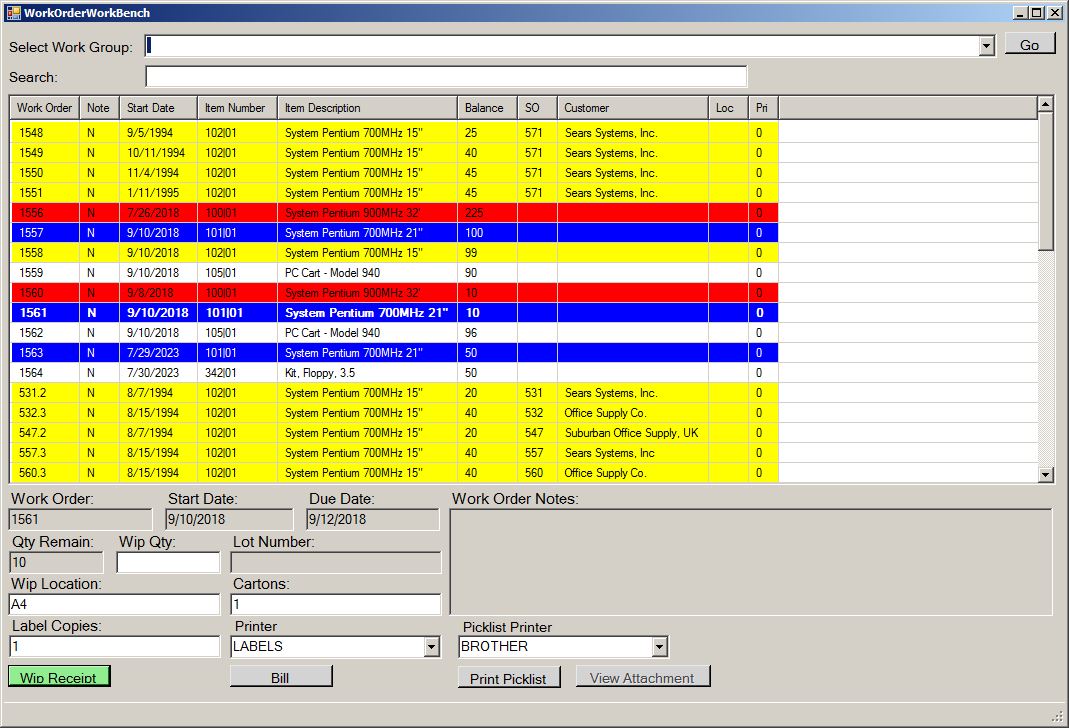
Wip Receipt
Bill
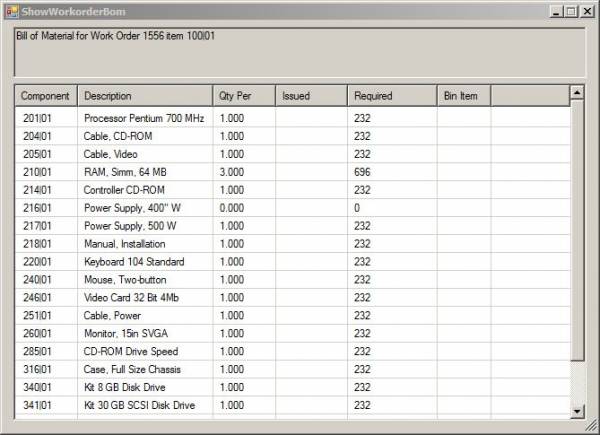
Hit the Bill button at any time to open up a listing of the Bill of Material for the selected Work Order and Item.
Picklist Printer
This functionality requires the Allow User to select printer Workbench constant to be enabled, and it requires the availability of a Standard Type printer for printing.
Select a printer from the drop-down list. Only Standard Type printers will be options for printing a picklist (as defined in the printer settings in the System Admin menu).
Print Picklist
Hit the Print Picklist button to print a picklist for the selected Work Order.
Show Sales Wip Transaction History
This function will generate a report for Sales WIP Transaction History (a work order created from a Sales Item Line Item type WG).
Start Date
Enter the date for the start of your desired date range.
End Date
Enter the date for the end of your desired date range.
Dates may be entered in the following formats:
- mm/dd/yyyy
- mm/dd/yy
- m/d/yyyy
- m/d/yy
- mm-dd-yyyy
- mm-dd-yy
- m-d-yyyy
- m-d-yy
- Use the T convention
- T will enter today’s date
- T-7 will enter a date 7 days in the past (change the number to change the desired date)
Run Report
After the Start Date and End Date have been entered, click the Run Report button to display the report. Use the toolbar across the top of the display to change the view, print the report, etc.
Cancel
Once the dates have been entered, the Cancel button will cancel the request and exit the date selection screen.
Work Order Scrap
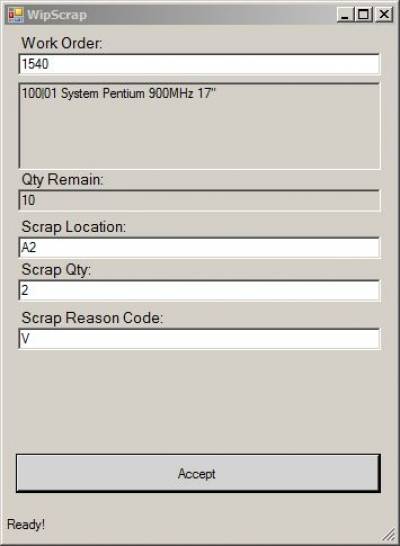
This function allows for both a Wip Receipt and Scrap transaction to happen as a single transaction. With customization and the constants setting enabled, a new work order to replace the scrapped item can be automatically generated as well. This function requires additional set up and training beyond standard WIP module use.
Clients interested in using this function should contact NovoRoi Systems for training and set up assistance.
Prod Receipt & Scrap
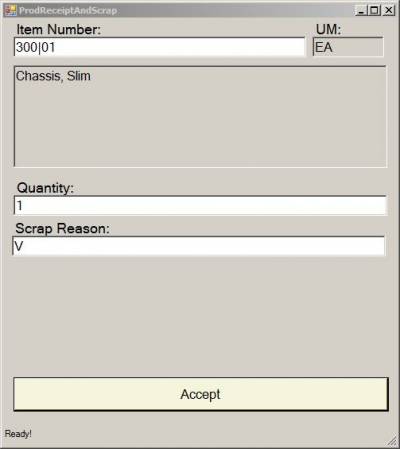
This function allows for both a Prod Receipt and Scrap transaction to happen as a single transaction. This function requires additional set up and training beyond standard REP module use.
Clients interested in using this function should contact NovoRoi Systems for training and set up assistance.
Wip Move Transaction History
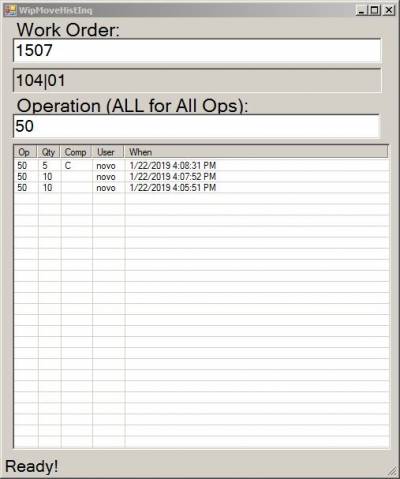
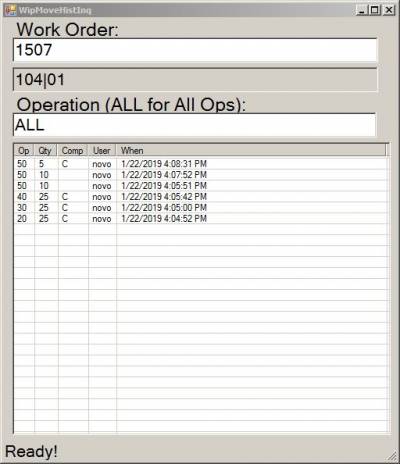
This function displays transaction history for Wip Move transactions. Operation, Quantity, Complete flag, NovoNexus user, and details on time and date will be displayed for each transaction.
Work Order
Enter the work order to be displayed. The specific operation to display will be entered in another field.
Item Number
The applicable item number for the work order will be displayed here.
Operation
Enter the operation and hit <enter> to display the history for that operation.
To display the transaction history for all operations on the work order, enter ALL in the Operation prompt:
Short PN
Item Number
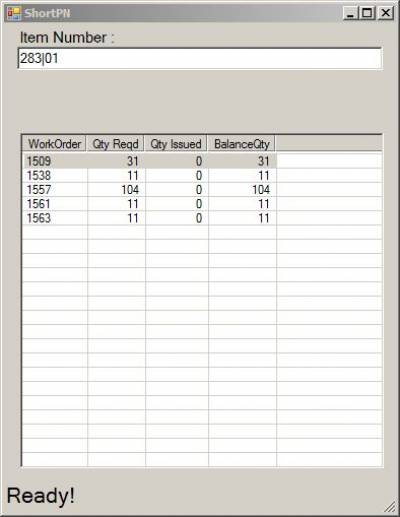
Enter the component item number to look up open work orders that contain that item.
A list of open work orders, the quantity required, the quantity issued, and the balance quantity will display.
Work Order Status
Work Order
Enter the work order number.
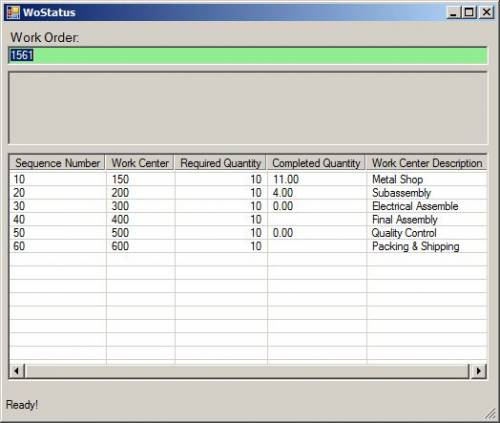
A chart detailing the work order Sequence Number, Work Center, Required Quantity, Completed Quantity and Work Center Description will display.
View Work Order Picklists
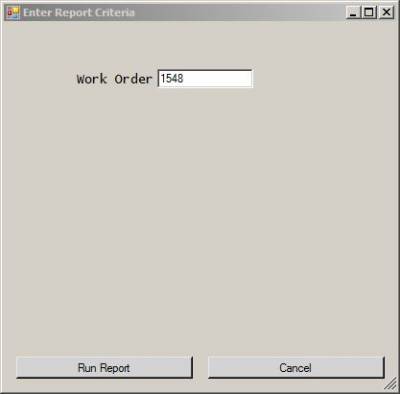
This function generates a work order picklist report to display on the screen.
Work Order
Enter the Work Order number.
Run Report
Click the Run Report button to display the report. Use the toolbar across the top of the display to change the view, print the report, etc.
Cancel
Print Work Order Picklists
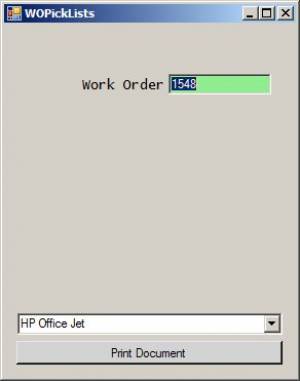
Work Order
Enter the Work Order number.
Printer Selection
Use the drop down box to select a printer.

